
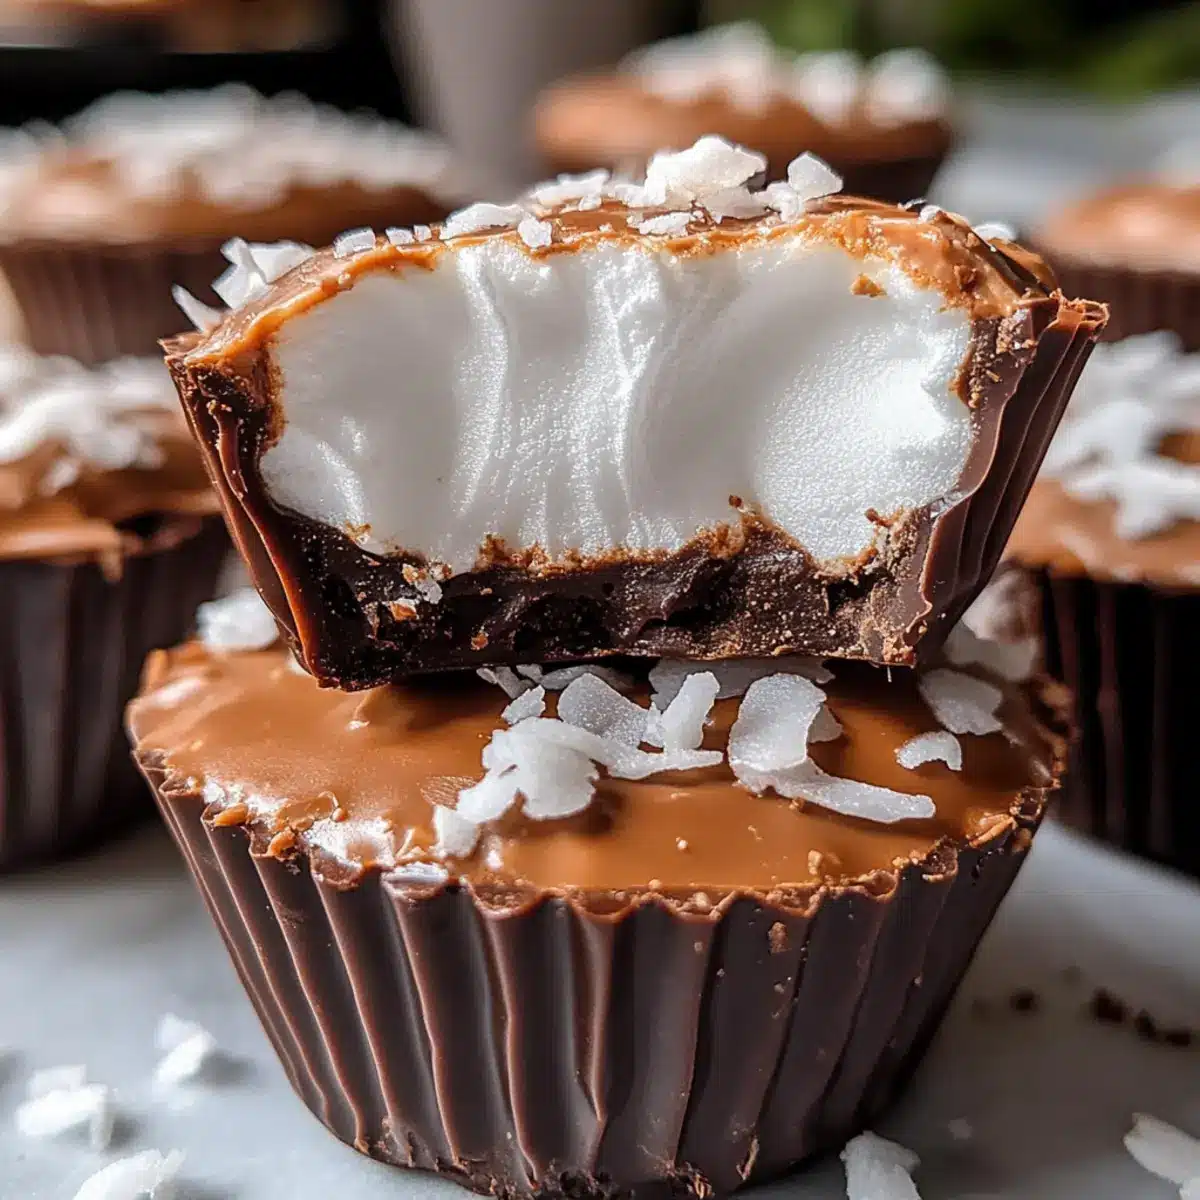
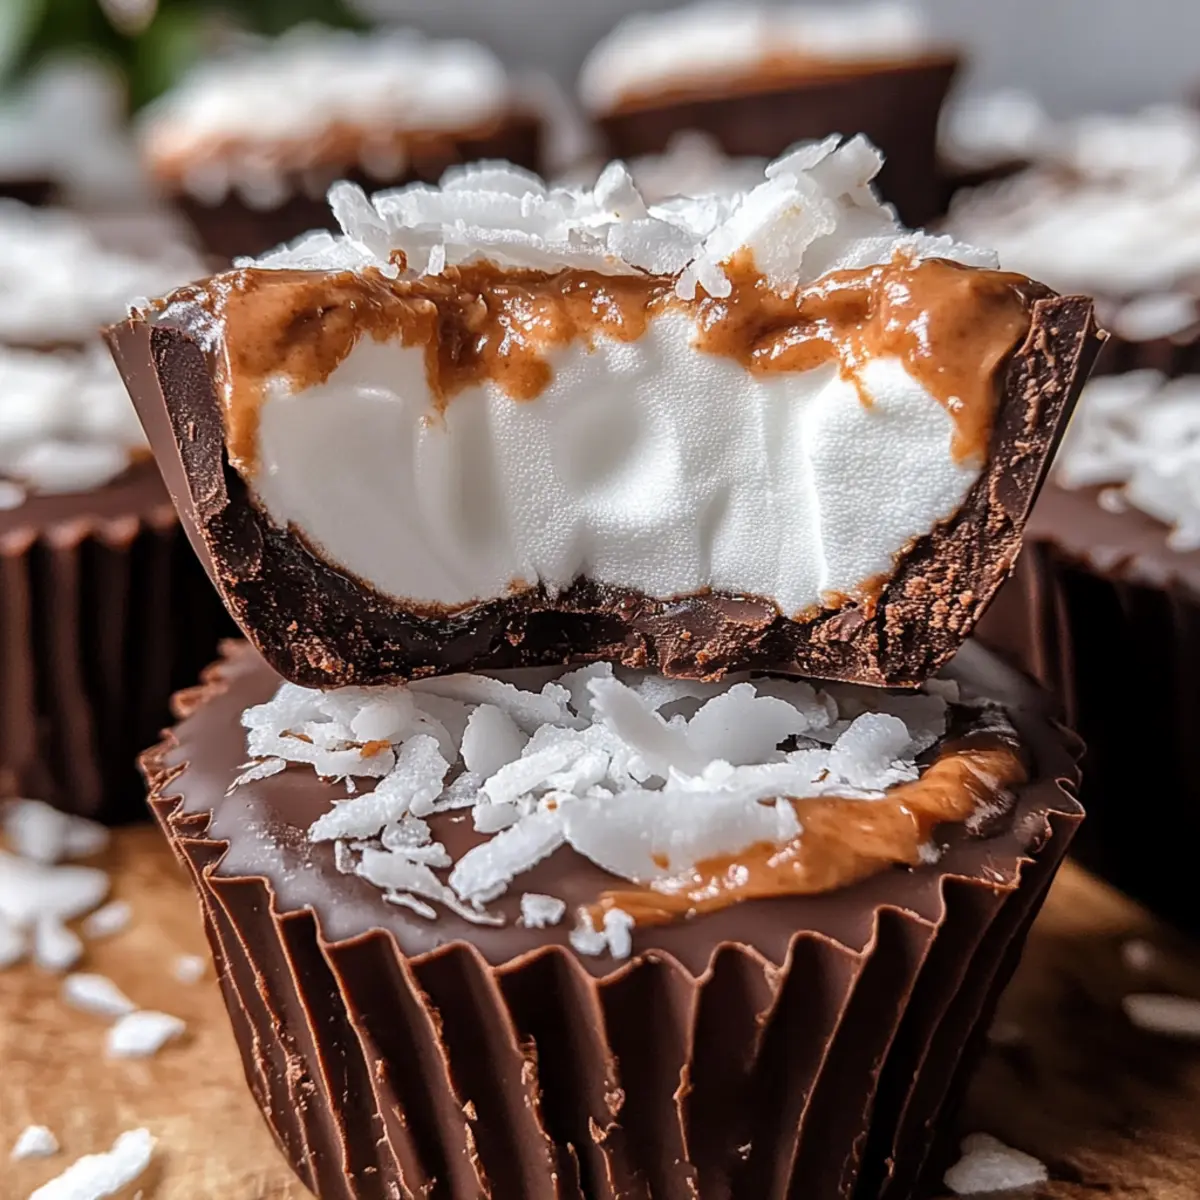
You know that moment when a sweet craving hits, and you want something nostalgic yet delightful? That’s when these Homemade Mallo Cups come to the rescue! A luscious combination of rich milk chocolate and fluffy marshmallow filling, these no-bake treats are elevated with a hint of coconut for that perfect bite. The beauty of this recipe lies in its versatility—you can easily customize these cups to suit your taste or dietary needs. Whether you’re whipping them up for a casual family snack or a festive gathering, they never fail to impress. Plus, the straightforward prep means you can indulge your sweet tooth without spending hours in the kitchen. Want to find out how to make these dreamy treats? Let’s dive in and create some magic!

Why Are Homemade Mallo Cups a Must-Try?
Irresistible flavor: The delightful combination of rich chocolate and fluffy marshmallow creates an experience that is both nostalgic and satisfying.
No-bake convenience: Whipping up these treats requires minimal effort, making them perfect for quick snacks or last-minute gatherings.
Customizable delight: Whether you prefer a touch of coconut or want to experiment with different chocolate types, the options are endless!
Crowd pleaser: These Homemade Mallo Cups are sure to impress guests at parties or be a hit with kids during snack time.
Storage-friendly: Easily make-ahead and store them for future cravings, ensuring you always have a sweet treat on hand!
Explore more fun ideas to pair with these treats by checking out our Cobb Salad Bliss for a refreshing meal alongside your dessert.
Homemade Mallo Cups Ingredients
For the Chocolate Base
- Milk Chocolate – Delivers sweetness and a smooth texture; try dark chocolate for a more intense flavor!
- Coconut Oil – Helps to achieve a glossy finish on the chocolate; can be substituted with vegetable oil if needed.
For the Filling
- Marshmallow Fluff – Creates a creamy, dreamy filling; feel free to make homemade fluff using whipped egg whites and sugar.
- Flaked Coconut – Adds delightful texture and taste; omit it if you’d prefer a simpler filling or substitute with nuts for crunch.
For Assembling
- Muffin Liners – Ideal for shaping the cups; silicone cups are a great alternative for easy removal!
With these delicious ingredients, you’re well on your way to crafting your own Homemade Mallo Cups. Embrace the beauty of customization and make these treats truly your own!
Step‑by‑Step Instructions for Homemade Mallo Cups
Step 1: Prepare the Muffin Tin
Begin by lining a muffin tin with muffin liners for easy removal of your Homemade Mallo Cups. Make sure each liner fits snugly in the tin. This will shape your cups as you build them, while the liners will help hold their form beautifully once they’re set.
Step 2: Melt the Chocolate
In a microwave-safe bowl or using a double boiler, melt the milk chocolate in 30-second increments until it’s completely smooth and glossy. Stir the chocolate well between each interval to avoid overheating. The melted chocolate will create a delicious base for your Mallo Cups, giving them that rich flavor you love.
Step 3: Incorporate Coconut Oil
Once your chocolate is smooth, mix in the coconut oil until fully incorporated. This addition will give the chocolate a lovely sheen and enhance its texture as it sets. Stir until the mixture is velvety and well-blended, ensuring the coconut oil is evenly distributed throughout the chocolate.
Step 4: Spoon the Chocolate into Liners
Using a spoon, dollop about 1 to 1½ tablespoons of the chocolate mixture into each muffin liner, gently spreading it up the sides to create a shell for your treat. This step is essential to ensure that the cups are properly formed and that they’ll cradle the creamy filling later on.
Step 5: Add Coconut and Refrigerate
Sprinkle a generous amount of flaked coconut over the chocolate in each liner to complement the flavors of your Homemade Mallo Cups. Place the muffin tin in the refrigerator for about 20 minutes, or until the chocolate shell is firm to the touch and holds its shape.
Step 6: Fill with Marshmallow Fluff
Once the chocolate has set, add 1½ tablespoons of marshmallow fluff to each cup, creating a delightful layer of creamy filling. Don’t hesitate to top each fluff layer with a bit more flaked coconut for added texture and flavor before moving on to the next step.
Step 7: Chill Again
Return the muffin tin to the refrigerator for another 20 minutes to allow the marshmallow fluff to firm up slightly. This setting time ensures that when you add the final chocolate layer, it nicely melds with the fluff, creating a harmonious treat that’s both delicate and delicious.
Step 8: Top with More Chocolate
Re-melt any remaining chocolate if needed and carefully pour it over the set marshmallow fluff in each cup, smoothing the top with a spatula. Make sure to cover the fluff completely, sealing in that heavenly filling. Place the cups back in the fridge for a final 20 minutes to let everything set perfectly.
Step 9: Serve and Enjoy
After your Homemade Mallo Cups have chilled and set, gently remove them from the muffin tins. Enjoy these delightful no-bake treats cold, and savor the wonderful combination of chocolate and marshmallow in each bite!
Expert Tips for Homemade Mallo Cups
- Melt Carefully: Ensure the chocolate is melted slowly and stirred well to avoid lumps—smooth chocolate means smooth cups!
- Layer Smartly: Be sure to refrigerate each layer sufficiently so the flavors meld beautifully without mixing; this creates distinct layers in your Homemade Mallo Cups.
- Spread Evenly: When spooning the chocolate up the sides of the liners, aim for an even coating. This prevents breakage when you remove the cups later.
- Customize Flavors: Feel free to adjust the fillings; experiment with different extracts for more adventurous flavor profiles in your Homemade Mallo Cups.
- Storage Matters: Keep your cups in an airtight container in the fridge to maintain their freshness and texture for up to a week!
What to Serve with Homemade Mallo Cups?
Nothing rounds out a snack or dessert quite like the perfect pairings, creating a delightful experience for your taste buds.
-
Fresh Fruit Salad: The sweetness of tropical fruits like pineapple and mango brings a refreshing contrast to the rich chocolate and marshmallow.
-
Coconut Milk Ice Cream: Creamy ice cream enhances the coconut notes in the Mallo Cups, offering a cool finish that’s perfect for warm days.
-
Chocolate Dipped Strawberries: These elegant treats echo the chocolate flavor, adding a touch of sophistication and a juicy burst of flavor.
-
Nutty Granola: A handful of crunchy granola on the side provides an exciting texture contrast, making every bite feel a little more special.
-
Iced Coffee: The smooth, rich flavors of iced coffee complement the sweetness of the cups, creating a delightful balance for coffee lovers.
-
Minty Mojito: A refreshing mint mojito brings vibrancy, enhancing the experience with its zesty flavors that mingle beautifully with chocolate.
-
Marshmallow Hot Chocolate: Lean into the nostalgia by pairing with this indulgent treat, topped with whipped cream for an extra sweet touch.
While your Homemade Mallo Cups stand out on their own, these additions will elevate your dessert experience and delight your guests!
How to Store and Freeze Homemade Mallo Cups
Fridge: Store your Homemade Mallo Cups in an airtight container for up to 1 week. This keeps them fresh and tasty, perfect for grabbing on the go!
Freezer: For longer storage, wrap each cup individually in plastic wrap and place them in a container. They can be frozen for up to 3 months without compromising their delightful flavor.
Thawing: When you’re ready to indulge, simply thaw the cups in the fridge for a few hours before enjoying them, ensuring they return to their perfectly creamy state.
Serving Tip: Serve your cups cold for the best texture and taste, allowing that rich chocolate and fluffy marshmallow filling to shine brightly!
Homemade Mallo Cups Variations & Substitutions
Customize your Homemade Mallo Cups with these delightful variations that will spark your creativity and taste buds!
- Dark Chocolate: Swap out milk chocolate for rich dark chocolate for a luxurious, deeper flavor.
- Coconut-Free: Omit the flaked coconut if you’re looking for a smoother texture, or replace it with crushed nuts for a delightful crunch.
- Nutty Delight: Mix in your favorite chopped nuts into the marshmallow filling for added texture and flavor. Almonds or pecans work beautifully!
- Fruit Fusion: Add chopped dried fruits like cranberries or apricots into the filling for a tangy twist against the sweet chocolate.
- Minty Fresh: Incorporate peppermint extract to the chocolate base for a refreshing mint-chocolate flavor that elevates the classic treat.
- Homemade Fluff: Prefer a personal touch? Make your own marshmallow fluff with whipped egg whites and sugar for a fresher taste.
- Savory Touch: Add a pinch of sea salt or a sprinkle of crushed pretzels to the chocolate topping for a sweet and salty experience.
- Specialty Toppings: Finish with a drizzle of caramel or a sprinkle of sea salt for an extra layer of flavor that takes your Homemade Mallo Cups to the next level.
Feel free to explore these ideas and think outside the box when making your delicious treats! If you’re craving more creative ideas, check out our delicious Cobb Salad Bliss as a refreshing meal to complement your dessert. Don’t forget, you can also elevate your flavors with a touch of our Pork Sausage Seasoning if you’re feeling adventurous in the kitchen!
Make Ahead Options
These Homemade Mallo Cups are perfect for meal prep enthusiasts! You can prepare the chocolate shells and refrigerate them for up to 3 days in advance, ensuring a smooth and hassle-free assembly later. Simply spoon the melted chocolate into the muffin liners, sprinkle with flaked coconut, and let them set in the fridge. Additionally, you can make the marshmallow fluff a day ahead and store it in an airtight container to keep it fresh. When you’re ready to enjoy these delicious treats, just add the fluff into the set chocolate cups, top with more chocolate, and refrigerate for another 20 minutes to set before serving. This way, you’ll have delightful Homemade Mallo Cups ready to impress with minimal effort!
Homemade Mallo Cups Recipe FAQs
How do I choose the right chocolate for my Homemade Mallo Cups?
Choosing milk chocolate gives your Mallo Cups a sweet, creamy base. However, for a deeper flavor, consider using dark chocolate instead. Whichever you choose, make sure the chocolate is of good quality for the best taste!
Can I store Homemade Mallo Cups, and how long do they last?
Absolutely! Store your Homemade Mallo Cups in an airtight container in the fridge for up to 1 week. This way, they’ll stay fresh and delicious, ready for your snacking pleasure.
What’s the best way to freeze Homemade Mallo Cups?
To freeze your Homemade Mallo Cups, wrap each one individually in plastic wrap and place them in a freezer-safe container. They can be stored this way for up to 3 months. When you’re ready to enjoy, just thaw them in the fridge for a few hours.
What if my chocolate doesn’t melt smoothly?
If your chocolate isn’t melting smoothly, you may have overheated it. Try melting in shorter increments (15-20 seconds) and stir between each burst. In the future, also consider adding a teaspoon of vegetable oil to help achieve a smoother consistency.
Can I make Homemade Mallo Cups allergy-friendly?
Yes, you can customize the ingredients to suit dietary preferences or allergies! For instance, use dairy-free chocolate or coconut oil instead of butter. Just be sure to double-check any substitutes for allergens, especially when serving to others.
Can I customize the flavor of my Homemade Mallo Cups?
The more the merrier! Feel free to experiment with various extracts like peppermint or almond for a unique twist. You can also add mix-ins like chopped nuts or dried fruits to enhance the flavor and texture of your cups!

Delicious Homemade Mallo Cups You Can Make No Bake Today
Ingredients
Equipment
Method
- Prepare the Muffin Tin: Line a muffin tin with muffin liners for easy removal.
- Melt the Chocolate: Melt the milk chocolate in 30-second increments until smooth.
- Incorporate Coconut Oil: Mix in the coconut oil until fully incorporated.
- Spoon the Chocolate into Liners: Dollop about 1 to 1½ tablespoons of chocolate mixture into each muffin liner.
- Add Coconut and Refrigerate: Sprinkle flaked coconut over chocolate and refrigerate for about 20 minutes.
- Fill with Marshmallow Fluff: Add 1½ tablespoons of marshmallow fluff to each cup.
- Chill Again: Return to the refrigerator for another 20 minutes.
- Top with More Chocolate: Carefully pour melted chocolate over the marshmallow fluff.
- Serve and Enjoy: Gently remove from muffin tins and enjoy your treats cold.
Leave a Reply