
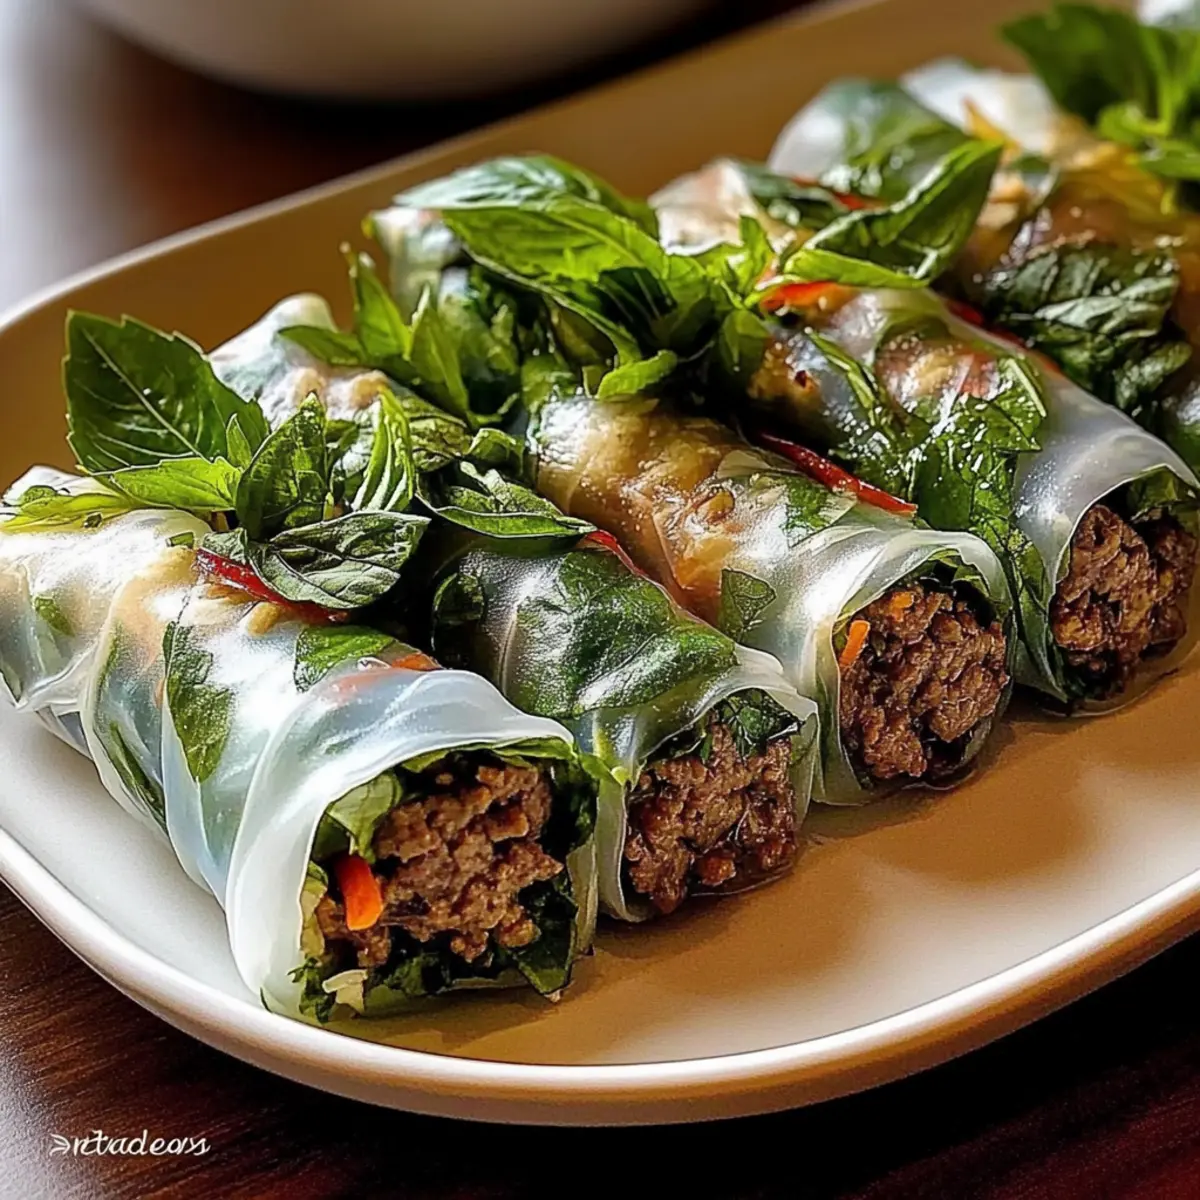
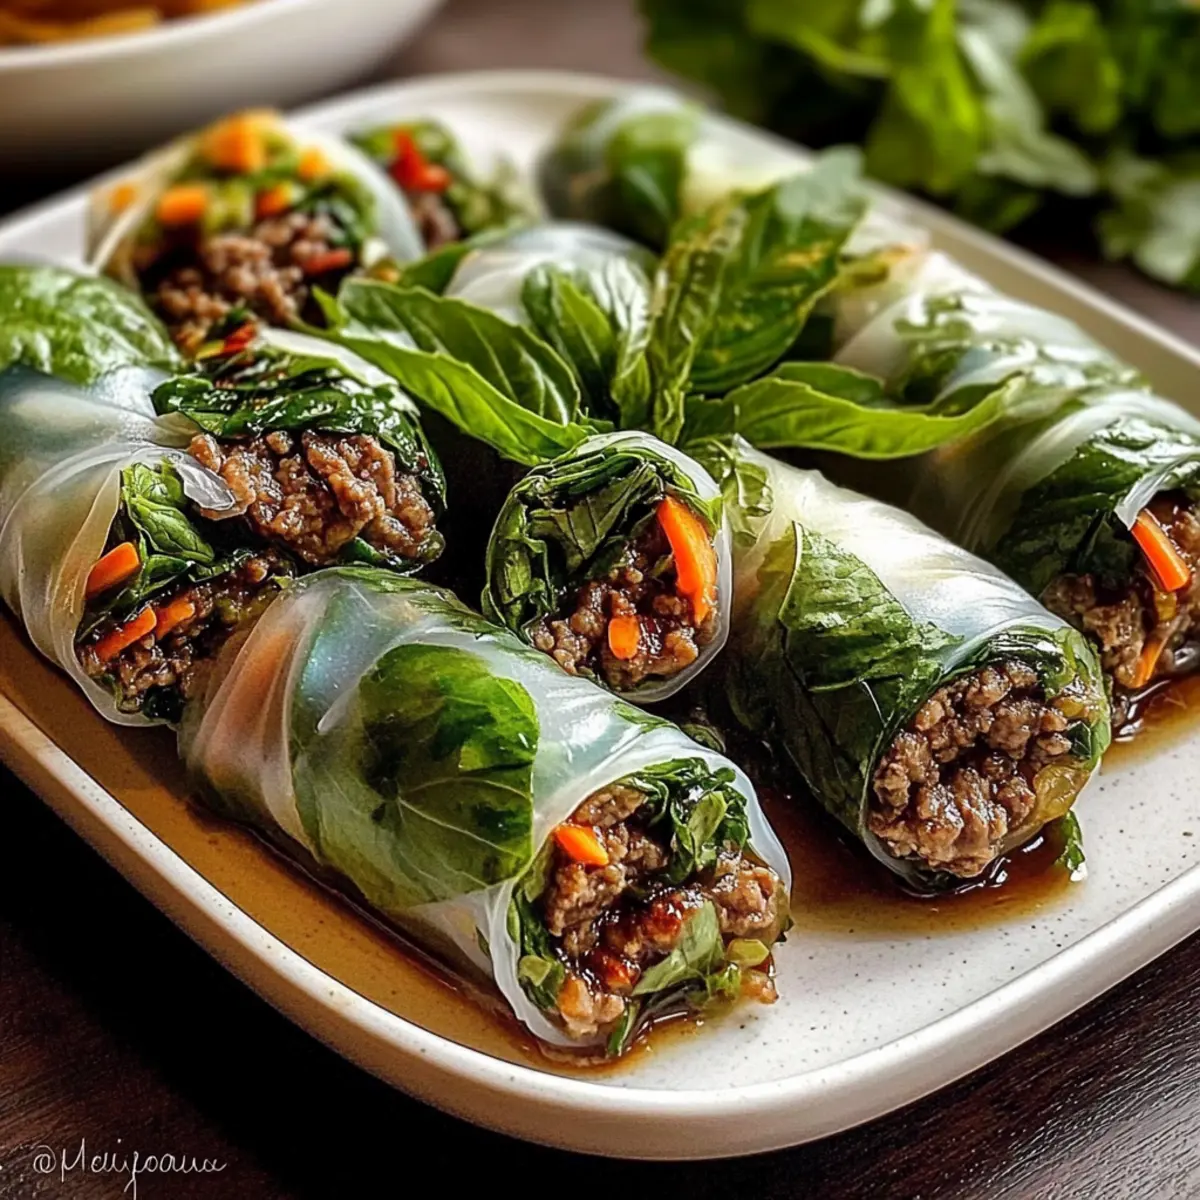
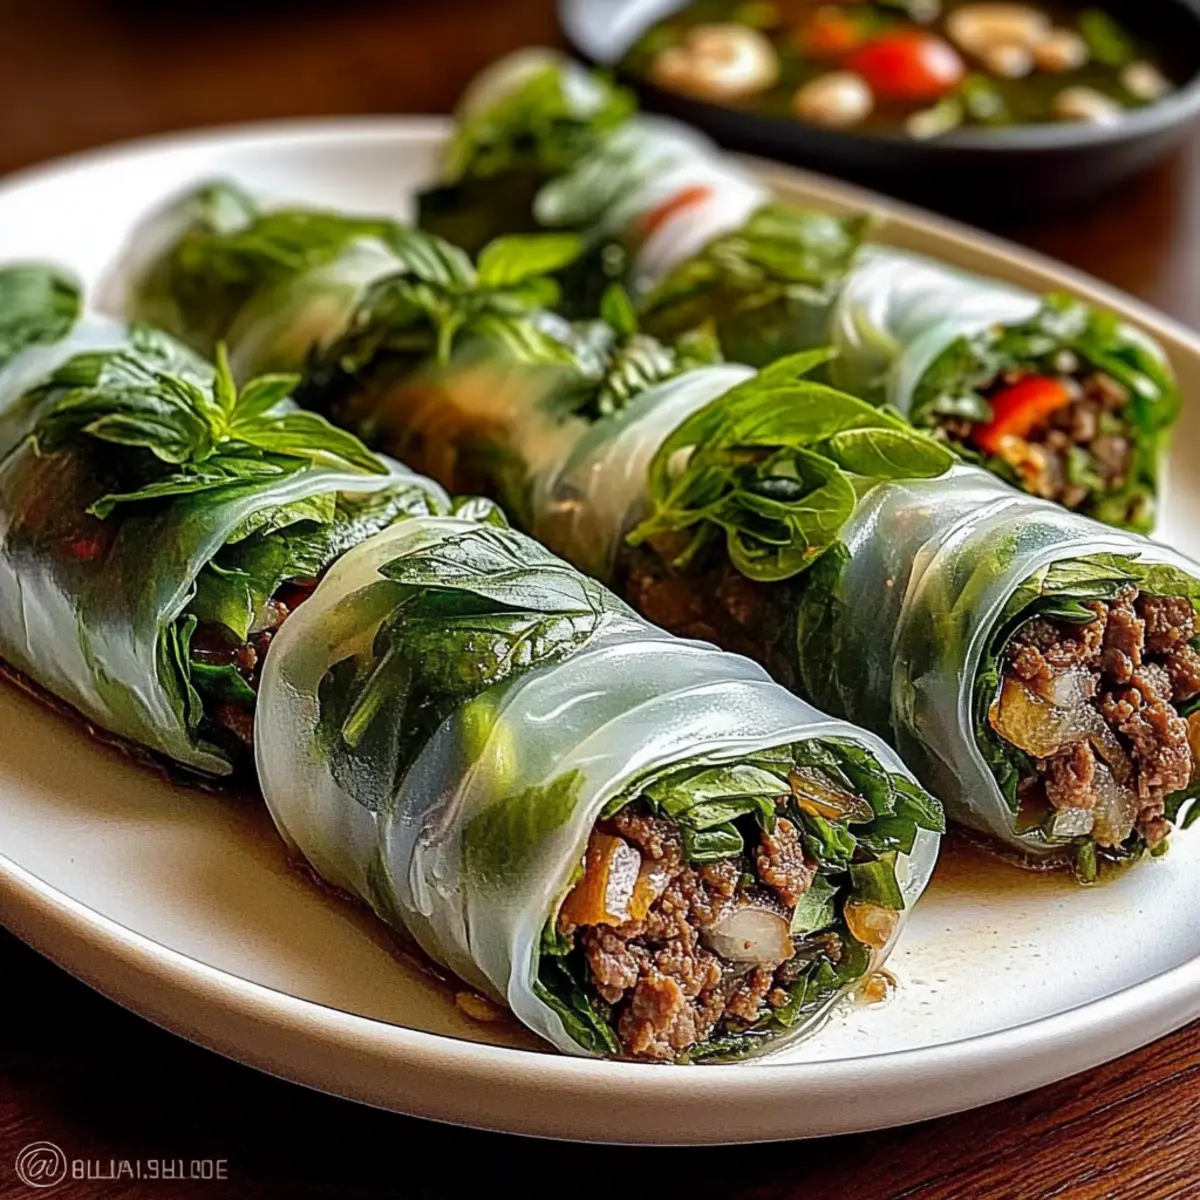
As I stared at my stocked refrigerator, a wave of inspiration washed over me—those vibrant herbs and fresh produce whispering culinary secrets, begging to be transformed into something extraordinary. Enter the Thai Basil Beef Rolls! In just 30 minutes, these delightful rolls combine tender beef and aromatic basil wrapped in delicate rice paper, creating a quick yet satisfying meal perfect for lunch, dinner, or a cozy snack. This gluten-free recipe is not only customizable to suit your taste but also a fantastic way to rejuvenate your takeout routine. With every bite, you’ll experience a burst of freshness that makes it hard to believe something so light can be this delicious. Curious to discover how to make these flavorful rolls come to life in your kitchen? Let’s roll!
Why Make Thai Basil Beef Rolls?
Freshness: Packed with vibrant herbs, these rolls deliver a burst of flavor that feels like spring on a plate.
Quick Prep: Ready in just 30 minutes, these rolls are perfect for busy weeknights, helping you sidestep that fast food rut.
Customizable: Personalize each roll to your liking—swap ingredients or add extra veggies for a unique twist every time!
Gluten-Free Delight: Enjoy without worries! These rolls are gluten-free, making them a thoughtful choice for those with dietary restrictions.
Crowd-Pleaser: Perfect for gatherings or family meals, everyone will want to try these deliciously fresh bites. Pair with a light dipping sauce for a treat that’s sure to impress. Looking for more inspirations? Try these with a side of Crockpot Thai Coconut or a refreshing Thai Cucumber Salad!
Thai Basil Beef Rolls Ingredients
For the Beef Filling
• Ground Beef (1 pound, 85/15) – A juicy and flavorful main protein source; can substitute with ground turkey or plant-based meat for a lighter option.
• Garlic (3 cloves, minced) – The aromatic backbone of the dish; no direct substitutions can match its distinct flavor.
• Shallot (1 small, finely chopped) – Contributes a mild sweetness and depth; can be swapped with finely chopped onion if necessary.
• Soy Sauce (2 tablespoons) – Offers vital umami and saltiness; use tamari for gluten-free.
• Oyster Sauce (1 tablespoon) – Adds a unique sweetness and richness; try vegetarian oyster sauce as a substitute if desired.
• Brown Sugar (1 teaspoon) – Balances the savory notes effortlessly; can substitute with honey or coconut sugar.
• Lime Juice (1 tablespoon) – Essential for brightening the flavors; lemon juice works well if lime isn’t available.
• Chili Flakes (1/2 teaspoon) or Thai Chili (1, minced) – Adds a kick of heat; omit for a milder roll.
• Fresh Thai Basil Leaves (1 cup, chopped) – Imparts a signature flavor that defines these rolls; regular basil can be used in a pinch.
For the Wrapper
• Rice Paper Wrappers (8 to 10) – These delicate sheets hold it all together; opt for thinner Vietnamese-style wrappers for the best texture.
Optional Fresh Fillings
• Mint Leaves, Cilantro, Green Onion, Carrots, Cucumbers – Customizable additions that enhance freshness and crunch; feel free to choose based on your preference.
With these key Thai Basil Beef Rolls ingredients, you’re ready to create a delightful meal that’s quick, fresh, and gluten-free!
Step‑by‑Step Instructions for Thai Basil Beef Rolls
Step 1: Sauté Aromatics
Heat 1 tablespoon of vegetable oil in a skillet over medium heat. Add 3 minced garlic cloves and 1 finely chopped shallot, sautéing for about 1 minute or until fragrant and softened. This step sets the flavorful foundation for your Thai Basil Beef Rolls, filling your kitchen with a delicious aroma as you prepare the filling.
Step 2: Cook the Beef
Next, add 1 pound of ground beef to the skillet, breaking it apart with a spatula. Sauté for approximately 6–8 minutes or until the beef is fully browned and cooked through. Stir frequently to ensure even cooking and flavor absorption, making sure there are no pink bits left visible in your tender beef mixture.
Step 3: Add Sauces and Season
Stir in 2 tablespoons of soy sauce, 1 tablespoon of oyster sauce, 1 teaspoon of brown sugar, and ½ teaspoon of chili flakes. Allow the mixture to simmer for 2–3 minutes, stirring occasionally, until it thickens slightly and becomes glossy. This enhances the savory profile of your filling, anchoring the flavor of your Thai Basil Beef Rolls.
Step 4: Incorporate Fresh Ingredients
Remove the skillet from heat and squeeze 1 tablespoon of lime juice over the beef mixture. Gently fold in 1 cup of chopped Thai basil leaves for that signature freshness. Let the filling cool slightly to avoid sogginess when wrapping, creating a perfect blend of flavors for your delicious rolls.
Step 5: Set Up for Rolling
Prepare a rolling station by filling a shallow dish with warm water. Nearby, arrange your rice paper wrappers and the cooled beef filling along with optional vegetables like mint leaves, cilantro, and sliced cucumbers. Having everything within arm’s reach makes the rolling process of the Thai Basil Beef Rolls smooth and efficient.
Step 6: Soak the Rice Paper
Take one rice paper wrapper and dip it into the warm water for 5–10 seconds until it softens slightly. Lay it flat on a clean, dry surface; the wrapper should be pliable but not overly soggy, ensuring it holds together well while you form your rolls.
Step 7: Add the Filling
On the lower third of the softened rice paper, place a small amount of the beef filling along with any optional fresh herbs or vegetables you desire. Be careful not to overfill; a modest quantity ensures easier rolling, leading to beautiful and tidy Thai Basil Beef Rolls that showcase their vibrant contents.
Step 8: Roll and Secure
Fold the bottom of the rice paper over the filling, tucking it in gently. Fold in the sides and then roll tightly from the bottom up to secure the filling inside. Take your time to ensure each roll is snug but not so tight that it tears the delicate rice paper.
Step 9: Repeat and Serve
Continue the process with the remaining rice paper wrappers and beef filling. Once all your rolls are complete, feel free to trim them in half for easier serving. Arrange the Thai Basil Beef Rolls on a platter and pair them with a light dipping sauce, ready to be enjoyed by everyone at your table.

How to Store and Freeze Thai Basil Beef Rolls
Fridge: Store leftover Thai Basil Beef Rolls in an airtight container with a damp paper towel for up to 2 days to keep the rice paper from drying out.
Freezer: For longer storage, wrap individual rolls tightly in plastic wrap and place them in a freezer bag; they can be frozen for up to 2 months.
Reheating: Thaw frozen rolls in the fridge overnight, then reheat in a warm skillet for a few minutes to restore their softness before serving.
Prepare Fresh: For best flavor and texture, consider rolling fresh when you’re ready to serve, using pre-prepared beef filling stored separately in the fridge for up to 4 days.
Make Ahead Options
These Thai Basil Beef Rolls are ideal for meal prep, allowing busy cooks to enjoy fresh flavors without the last-minute rush! You can prepare the beef filling up to 4 days in advance; simply refrigerate it in an airtight container after cooking. For maximum quality, store the rice paper wrappers separately in a cool, dry place. When you’re ready to serve, roll the filling in the softened wrappers just before enjoying. This ensures the rice paper remains tender and prevents sogginess, letting you savor delicious, homemade Thai Basil Beef Rolls with minimal effort on your busy weeknights.
Thai Basil Beef Rolls Variations
Feel free to turn these Thai Basil Beef Rolls into your own masterpiece with a few fun and easy swaps!
-
Vegetarian: Replace ground beef with chopped mushrooms, tofu, or tempeh for a delightful meat-free option. This not only makes them plant-based but still brimming with flavor!
-
Gluten-Free Upgrade: Use tamari instead of soy sauce to keep these rolls gluten-free. Enjoy the same rich flavor without any worries about gluten sensitivity.
-
Flavor Boost: Mix up the dipping sauce by combining soy sauce, lime juice, and a touch of honey or agave syrup. It adds a sweet tang that beautifully complements the savory filling.
-
Extra Crunch: Add veggies like julienned bell peppers, radishes, or shredded carrots into the filling for a satisfying, crunchy texture with every bite. Feel free to mix and match depending on what’s in season!
-
Heat Seeker: If you love spice, toss in some sliced jalapeños or sriracha into your filling for an extra kick! Just be sure to adjust the amounts based on your heat preference.
-
Fresh Herb Twist: Don’t stop at Thai basil! Experiment with other herbs like cilantro or mint for a fresh twist that brightens each roll.
-
No Carb Option: Instead of rice paper, use large lettuce leaves for a low-carb alternative. They bring a satisfying crispness and make for a refreshing roll.
-
Savory Sweetness: Swap brown sugar for coconut sugar or honey in the filling for a subtle, natural sweetness without losing depth. This twist enhances the flavor profile beautifully!
With these variations, each time you prepare these tasty Thai Basil Beef Rolls can be a new experience. Happy cooking! And for a refreshing drink to enjoy with them, consider trying a side of Crockpot Thai Coconut or a zesty Thai Cucumber Salad!
What to Serve with Thai Basil Beef Rolls?
Indulge in a delightful experience as you create a full meal that perfectly complements these tasty rolls with a flourish of flavors and textures.
-
Cold Noodle Salad: A refreshing side that brings a light and tangy crunch, elevating your meal.
-
Lightly Sautéed Edamame: Rich in protein and fiber, these tender bites add a boost of freshness and a satisfying green element.
-
Thai Iced Tea: Its creamy sweetness perfectly balances the savory, herbaceous notes of the beef rolls, transforming your meal into a delightful feast.
-
Crispy Spring Rolls: Complement the texture of your beef rolls with these crunchy, veggie-packed delights for an inviting mix of softness and crunch.
-
Zesty Cucumber Salad: The cool acidity of this salad cuts through the richness, enhancing the overall experience with its crisp cucumbers and zesty dressing.
-
Sweet Chili Sauce: Drizzle this over your rolls or use it as a dipping sauce for a touch of spicy-sweetness that amplifies the flavor.
-
Mango Sticky Rice: Finish the meal on a sweeter note with this classic Thai dessert, adding a lovely contrast to the savory rolls.
Pairing these delicious elements with your Thai Basil Beef Rolls not only rounds out the meal but also provides a feast for the senses that you and your guests will adore!
Expert Tips for Thai Basil Beef Rolls
- Soak Wisely: Avoid soaking rice paper too long; it should only be dipped for 5–10 seconds to maintain firmness and prevent tearing.
- Cool Before Rolling: Let the beef filling cool slightly before rolling to avoid softening the rice paper wrappers, ensuring a neat and tidy wrap.
- Rolling Technique: Work on a damp surface, which helps keep the rice paper intact and makes rolling smoother, preventing any unnecessary tearing.
- Don’t Overfill: Be mindful not to overstuff the rolls; a smaller amount of filling allows for easier rolling and ensures that the Thai Basil Beef Rolls are securely wrapped.
- Crispy Variation: For an exciting twist, after rolling, consider pan-frying or baking the finished rolls for a crispy texture that contrasts beautifully with the fresh filling.
Thai Basil Beef Rolls Recipe FAQs
What kind of beef should I use for Thai Basil Beef Rolls?
I recommend using ground beef with an 85/15 fat ratio, which provides a juicy and flavorful filling. If you prefer a lighter option, ground turkey or plant-based meat are great alternatives too. Just ensure your chosen protein is well-seasoned to capture the essence of this dish.
How do I store leftover Thai Basil Beef Rolls?
Store leftover rolls in an airtight container, layering them with a damp paper towel to keep the rice paper from drying out. They are best consumed within 2 days for optimal freshness. This method preserves their texture and flavor so you can enjoy them again!
Can I freeze Thai Basil Beef Rolls?
Absolutely! To freeze, tightly wrap each roll in plastic wrap and place them in a freezer bag. They can be frozen for up to 2 months. When you’re ready to eat them, simply thaw in the refrigerator overnight, and then reheat in a warm skillet for a few minutes to restore their delightful chewiness.
What if my rice paper tears while rolling?
If the rice paper tears, don’t worry! It happens to the best of us. You can overlap the torn edges to create a double layer for reinforcement. Also, make sure you’re not soaking the rice paper for too long—just 5-10 seconds in warm water should do the trick to keep it pliable yet firm.
Are these Thai Basil Beef Rolls suitable for people with gluten allergies?
Yes! This recipe is gluten-free as long as you substitute the regular soy sauce with tamari. Additionally, using gluten-free oyster sauce ensures everyone can enjoy these flavorful rolls without worry. Always double-check your ingredient labels to make sure they fit your dietary needs!
How long can I keep the beef filling in the refrigerator?
You can store the beef filling in the fridge for up to 4 days. This makes it perfect for meal prepping! Simply reheat the filling when you’re ready to roll and enjoy fresh Thai Basil Beef Rolls. It saves time and allows for quick, delicious meals at a moment’s notice.
Savory Thai Basil Beef Rolls - Quick, Fresh, and Gluten-Free
Ingredients
Equipment
Method
- Heat 1 tablespoon of vegetable oil in a skillet over medium heat. Add 3 minced garlic cloves and 1 finely chopped shallot, sautéing for about 1 minute or until fragrant and softened.
- Next, add 1 pound of ground beef to the skillet, breaking it apart with a spatula. Sauté for approximately 6–8 minutes or until the beef is fully browned and cooked through.
- Stir in 2 tablespoons of soy sauce, 1 tablespoon of oyster sauce, 1 teaspoon of brown sugar, and ½ teaspoon of chili flakes. Allow the mixture to simmer for 2–3 minutes, stirring occasionally.
- Remove the skillet from heat and squeeze 1 tablespoon of lime juice over the beef mixture. Gently fold in 1 cup of chopped Thai basil leaves.
- Prepare a rolling station by filling a shallow dish with warm water. Arrange your rice paper wrappers and the cooled beef filling along with optional vegetables.
- Take one rice paper wrapper and dip it into the warm water for 5–10 seconds until it softens slightly. Lay it flat on a clean, dry surface.
- On the lower third of the softened rice paper, place a small amount of the beef filling along with any optional fresh herbs or vegetables.
- Fold the bottom of the rice paper over the filling, tucking it in gently. Fold in the sides and then roll tightly from the bottom up.
- Continue the process with the remaining rice paper wrappers and beef filling. Arrange the rolls on a platter and pair with a light dipping sauce.
Leave a Reply