
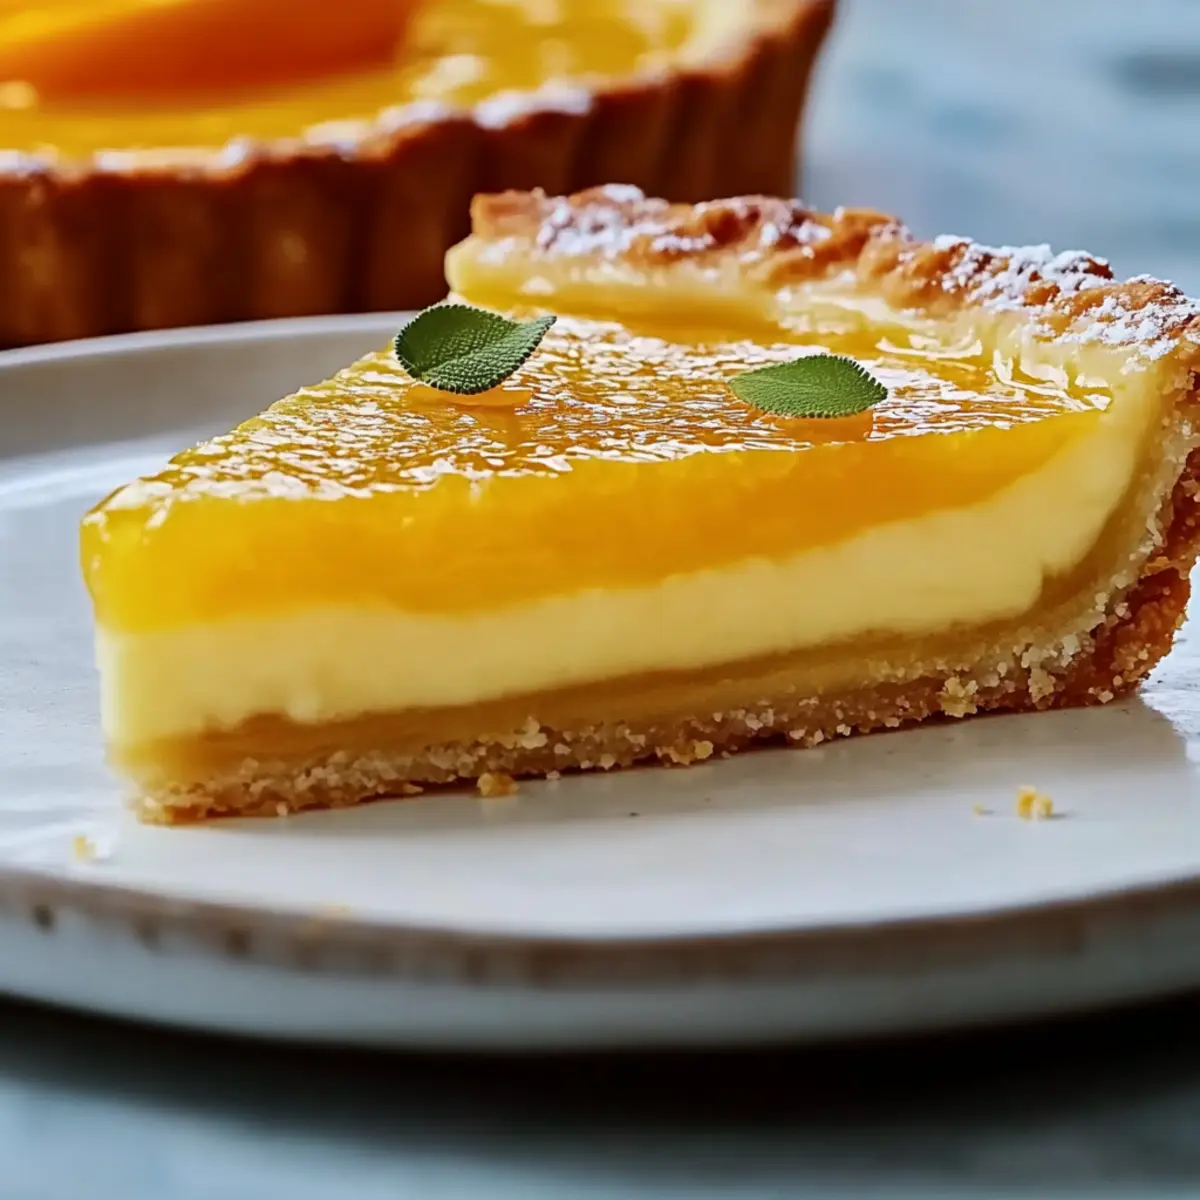
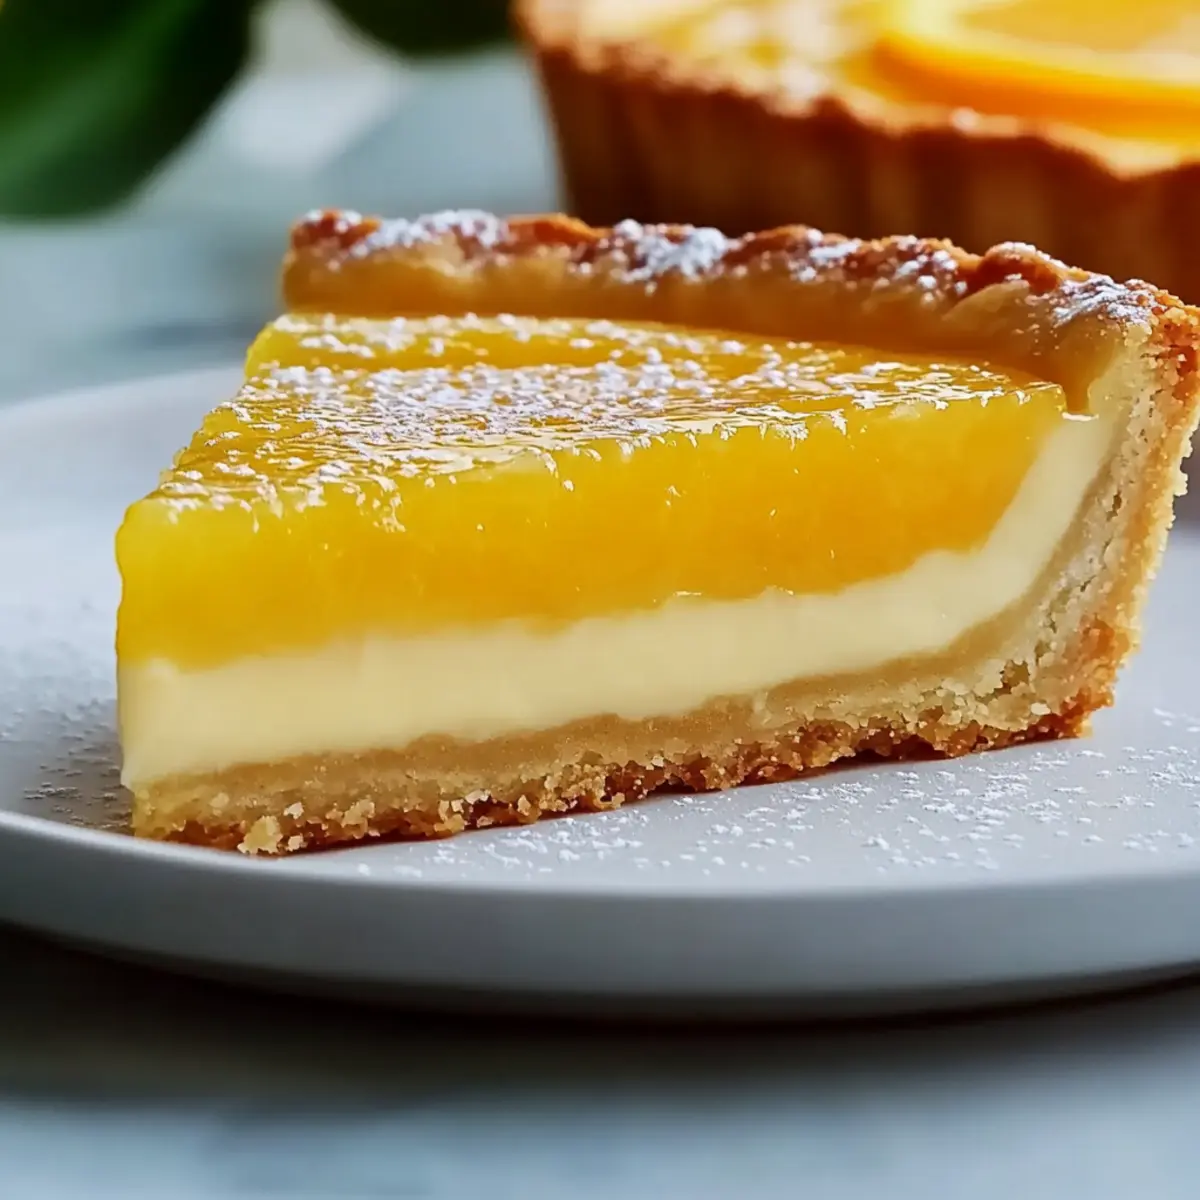
As I carefully sliced through the golden crust of my Classic Orange Tart, the tangy aroma of fresh oranges filled the kitchen, instantly transporting me to sun-drenched citrus groves. This elegant dessert brings together the delicate crunch of a flaky crust and the velvety sweetness of orange curd, offering a delightful balance of flavors that’s just perfect for impressing your guests. What I love most is how simple it is to whip up this stunning centerpiece with everyday ingredients, making it an effortless addition to any gathering. Plus, it’s a make-ahead dream, allowing you to savor every moment with friends and family. Are you ready to create this show-stopping Classic Orange Tart that will have everyone asking for seconds?
Why Is This Tart a Show-Stopper?
Effortless Elegance: The Classic Orange Tart effortlessly combines stunning aesthetics with a simple process that anyone can master in the kitchen.
Bright Citrus Flavor: The vibrant orange curd filling bursts with sunny citrus notes, making every bite a refreshing delight.
Make-Ahead Marvel: Perfect for busy schedules, this tart can be prepared a couple of days in advance, allowing you to enjoy your gathering stress-free.
Versatile Garnishes: Enhance its appeal by adding fresh berries or a sprinkle of crushed pistachios, creating a colorful presentation that will wow your guests.
Crowd-Pleasing Delight: Ideal for dinner parties or casual gatherings, it’s a dessert that captures the hearts—and taste buds—of everyone.
Consider pairing it with a delightful cup of black tea or showcasing it beside a Cranberry Brie Tart for an impressive dessert spread!
Classic Orange Tart Ingredients
For the Crust
- Flour – Provides structure for the tart crust; gluten-free flour can be substituted for those with dietary restrictions.
- Powdered Sugar – Adds sweetness and smoothness to the crust; you can use granulated sugar, although the texture might vary.
- Almond Flour – Introduces a delicate nutty flavor and tender crumb; for a nut-free version, replace it with additional all-purpose flour.
- Salt – Enhances overall flavor; no substitutions are recommended.
- Orange Zest – Infuses the crust with a bright citrus aroma; feel free to swap for lemon zest for a different citrus twist.
- Chilled Butter – Creates that irresistible flaky texture; use vegan butter for a dairy-free option.
- Egg Yolk – Adds richness and binds the crust; a flax egg makes for a great egg-free alternative.
- Cold Water – Hydrates the dough and is essential for the crust’s texture; no substitutions needed.
For the Orange Curd Filling
- Fresh Orange Juice – The primary flavor component, bringing sunny brightness; avoid bottled juice for the best taste—Valencia or Navel oranges are recommended.
- Eggs – Essential for creating a creamy filling; no substitutes suggested for this key ingredient.
- Superfine Sugar – A sweetening agent for the curd; granulated sugar can work, but superfine sugar incorporates better.
- Cornstarch – Thickens the curd to achieve that silky texture; arrowroot starch can be used as a substitute.
- Gelatin – Helps set the curd for stability; vegetarian alternatives like agar-agar are a fine option.
For the Topping
- Heavy Cream – Creates a rich and luscious whipped topping; coconut cream works well for a dairy-free version.
- Powdered Sugar (for topping) – Adds an extra touch of sweetness to the whipped cream; no direct substitutions are recommended.
- Optional Garnishes (orange segments, crushed pistachios, mint leaves) – Enhance flavor and visual appeal; feel free to substitute with your favorite fresh fruits or nuts.
Feel free to gather these simple yet delightful ingredients for your Classic Orange Tart; this dessert is certain to become a cherished family favorite!
Step‑by‑Step Instructions for Classic Orange Tart
Step 1: Prepare the Crust
Begin by preheating your oven to 200°C (390°F) while you create the tart crust. In a food processor, combine flour, powdered sugar, almond flour, salt, and orange zest, pulsing until well mixed. Add chilled butter and pulse until the mixture resembles coarse crumbs. Incorporate the egg yolk and cold water, mixing until a dough forms. Chill the dough in the refrigerator for at least 15 minutes to firm up.
Step 2: Shape and Bake the Crust
Roll out the chilled dough on a lightly floured surface until it’s about 3 mm thick. Carefully transfer the rolled dough to a tart pan, pressing it into the sides and trimming the edges neatly. Prick the base with a fork to prevent bubbling, then place parchment paper on top and add pie weights. Blind bake the crust in the preheated oven for 15–20 minutes, or until golden brown. Remove from the oven and let cool.
Step 3: Make the Orange Curd Filling
While the crust cools, prepare the filling for your Classic Orange Tart. Heat fresh orange juice in a saucepan until steaming, but not boiling. In a separate bowl, whisk together eggs, superfine sugar, and cornstarch until smooth. Temper the egg mixture by slowly adding the hot juice while whisking continuously. Pour the mixture back into the saucepan and cook over low heat, stirring until it thickens and coats the back of a spoon.
Step 4: Set the Filling
Once thickened, remove the mixture from heat and stir in gelatin and butter, mixing until both are completely dissolved. Pour the orange curd into the cooled tart shell, smoothing the top with a spatula. Refrigerate the tart for at least 3 hours, or overnight, to allow the filling to fully set and develop its flavors.
Step 5: Prepare the Whipped Cream
When you’re ready to serve the Classic Orange Tart, make the luscious topping by whipping heavy cream in a large bowl until soft peaks form. Gradually add powdered sugar, continuing to whip until just combined and creamy, being careful not to over-whip to avoid a grainy texture.
Step 6: Garnish and Serve
Once the tart has thoroughly chilled and set, take it out of the fridge. Generously dollop the whipped cream on top of the tart, then feel free to decorate with fresh orange segments, crushed pistachios, and mint leaves for an elegant finish. Slice the tart carefully and serve chilled, delighting your guests with this zesty and vibrant Classic Orange Tart!

Classic Orange Tart Variations & Substitutions
Feel free to make this Classic Orange Tart your own and let your creativity shine through with these delightful variations!
-
Gluten-Free: Use gluten-free flour blends instead of regular flour for a delicious gluten-free crust that everyone can enjoy.
-
Dairy-Free: Substitute chilled butter with vegan butter and use coconut cream for a rich, dairy-free whipped topping that maintains creamy goodness.
-
Citrus Twist: Swap out fresh orange juice for lemon or lime juice for a zesty twist. The tartness will brighten the flavors in a whole new way.
-
Extra Flavor: Add a splash of vanilla extract or almond extract to the filling for a subtle layer of flavor that complements the citrus perfectly.
-
Nutty Crunch: Mix chopped nuts like pecans or walnuts into the crust for added texture and a delightful nutty flavor that pairs beautifully with the smooth curd.
-
Berry Burst: Top the tart with fresh berries like raspberries or strawberries instead of traditional garnishes for a pop of color and a juicy contrast to the orange filling.
-
Chocolate Drizzle: Drizzle melted dark chocolate over the top after adding whipped cream for an indulgent touch that adds a luxurious flair.
-
Make it Mini: Create individual mini tarts using a muffin tin for a fun presentation. Personal-sized servings are perfect for parties or special events!
With these variations, you can create a dessert that reflects your taste preferences. And while you’re experimenting, consider pairing this tart with a lovely Cranberry Brie Tart as part of a stunning dessert spread or indulge in a sweet note with a Gingerbread Chocolate Tart for seasonal occasions!
Make Ahead Options
These Classic Orange Tart options are perfect for those who want to streamline their dessert preparations! You can easily make the tart crust up to 3 days in advance; simply wrap it tightly in plastic wrap after baking to maintain its flaky texture. The orange curd filling can also be prepared up to 24 hours ahead; refrigerate it in an airtight container to preserve its creamy consistency. When you’re ready to enjoy your tart, simply pour the chilled filling into the pre-baked crust and refrigerate for at least 3 hours (or overnight) to set. Finish with whipped cream and garnishes just before serving to ensure everything is fresh and delightful. Enjoy stress-free hosting with this delicious Classic Orange Tart!
What to Serve with Classic Orange Tart
The delightful notes of zesty orange combined with creamy textures make for an exquisite dessert, but pairing it right elevates the experience.
- Creamy Mashed Potatoes: These fluffy potatoes serve as a comforting counterbalance to the tart’s citrus zing, ensuring a well-rounded meal.
- Sorted Fresh Berries: A colorful medley of strawberries, blueberries, and raspberries adds refreshing brightness and complements the orange flavors beautifully.
- Light Salad with Citrus Dressing: A crisp salad featuring mixed greens and a light citrus vinaigrette brings a refreshing crunch that perfectly offsets the richness of the tart.
- Sparkling Water with Mint: The effervescence of sparkling water infused with fresh mint acts as a palate cleanser, enhancing the overall dining experience.
- Chilled White Wine: A glass of light, fruity white wine, like Sauvignon Blanc, pairs beautifully, enhancing the tart’s sunny flavors while providing a refreshing contrast.
- Almond Biscotti: Crunchy biscotti add an elegant touch to your dessert table, creating a delightful contrast in texture that guests will adore.
- Gourmet Cheese Board: Offer a selection of soft cheeses, like brie or goat cheese, that serve as a rich accompaniment to the tart, balancing out its sweetness.
- Ginger Tea: This warm, spicy beverage can offer a lovely conclusion to your meal, perfectly harmonizing with the tart’s bright citrus notes.
Expert Tips for Classic Orange Tart
-
Chill the Dough: Ensure your tart dough is well-chilled before rolling. This prevents the crust from shrinking during baking, helping achieve that perfect flaky texture.
-
Proper Blind Baking: Use pie weights during blind baking to maintain the crust’s shape. This step is crucial for a crisp yet tender base, so don’t skip it!
-
Juice Up Freshly: Always use fresh orange juice for the filling. Bottled juice lacks the bright flavor, making your Classic Orange Tart less vibrant and appealing.
-
Watch the Whipped Cream: Be cautious while whipping your cream. Stop once soft peaks form. Over-whipping leads to a grainy texture, which is less pleasant.
-
Let It Set: Allow the tart to chill for at least 3 hours, or ideally overnight. This ensures a clean slice and allows the flavors to meld beautifully.
-
Garnish Wisely: Add garnishes just before serving. Fresh fruits and nuts enhance visual appeal and flavor, making your Classic Orange Tart irresistible!
How to Store and Freeze Classic Orange Tart
Fridge: Store covered in the refrigerator for up to 3 days. Make sure the tart is well-wrapped to keep the crust crisp and the filling fresh.
Freezer: For longer storage, freeze the unbaked tart shell wrapped tightly in plastic wrap for up to 2 months. Bake from frozen, adding a few extra minutes to the baking time.
Reheating: If you’ve made the tart ahead and stored it in the fridge, enjoy it chilled. For a warm slice, gently reheat it in a 160°C (320°F) oven for about 10 minutes, but avoid microwave reheating to prevent sogginess.
Make-Ahead Tip: The Classic Orange Tart can be prepared up to 2 days in advance, just add the whipped cream and garnishes right before serving for the best texture and presentation.
Classic Orange Tart Recipe FAQs
What kind of oranges should I use for the curd?
Absolutely! For the best flavor, I recommend using fresh Valencia or Navel oranges. Their sweet and tangy juice elevates the tart, while bottled juice simply doesn’t offer the same brightness. Look for firm oranges with a vibrant color and avoid any with dark spots or blemishes.
How should I store the Classic Orange Tart?
It’s best to store your Classic Orange Tart covered in the refrigerator for up to 3 days. Make sure to wrap it well to keep the crust crisp and the filling fresh. Also, chilling it enhances the flavor, making each slice even more delightful!
Can I freeze the Classic Orange Tart or its components?
Yes! You can freeze the unbaked tart shell wrapped tightly in plastic wrap for up to 2 months. When you’re ready to bake, simply add a few extra minutes to the baking time. Unfortunately, the filled tart doesn’t freeze well because the texture might change; it’s best enjoyed fresh.
What if my tart crust turns out tough?
Oh no! A tough crust usually happens if the dough is overworked. Remember to handle it gently and avoid excessive mixing when combining ingredients. If you find your crust tough, it can help to chill it properly before rolling out, as well. Using cold butter and keeping everything chilled ensures a flaky texture.
Are there any allergen considerations for this recipe?
Very! If you’re making the Classic Orange Tart for guests, be aware of common allergens. You can substitute gluten-free flour for those who need it, use vegan butter for a dairy-free option, and a flax egg for those avoiding eggs. Always ask your guests about dietary restrictions to make it a safe and enjoyable dessert for everyone.
Can I make the tart ahead of time?
Definitely! One of the beauties of this Classic Orange Tart is that you can prepare it up to 2 days in advance. Just hold off on adding the whipped cream and garnishes until right before serving for the best texture and presentation. This way, you can relax and enjoy your time with family and friends!

Classic Orange Tart That Brightens Any Dessert Table
Ingredients
Equipment
Method
- Preheat your oven to 200°C (390°F). In a food processor, combine flour, powdered sugar, almond flour, salt, and orange zest. Pulse until mixed.
- Add chilled butter and pulse until it resembles coarse crumbs. Incorporate the egg yolk and cold water, mixing until a dough forms. Chill for at least 15 minutes.
- Roll out the chilled dough until about 3 mm thick. Transfer to a tart pan, press into the sides, and trim the edges. Prick the base with a fork, add parchment paper, and pie weights. Blind bake for 15–20 minutes until golden brown. Let it cool.
- Heat fresh orange juice in a saucepan until steaming. Whisk together eggs, superfine sugar, and cornstarch in a bowl until smooth. Slowly add hot juice while whisking. Cook the mixture over low heat until thickened.
- Remove from heat and stir in gelatin and butter until dissolved. Pour into the cooled tart shell, smoothing the top. Refrigerate for at least 3 hours or overnight.
- Whip heavy cream in a bowl until soft peaks form. Gradually add powdered sugar and whip until creamy.
- Dollop whipped cream on top, decorate with orange segments, crushed pistachios, and mint leaves. Slice carefully and serve chilled.
Leave a Reply