
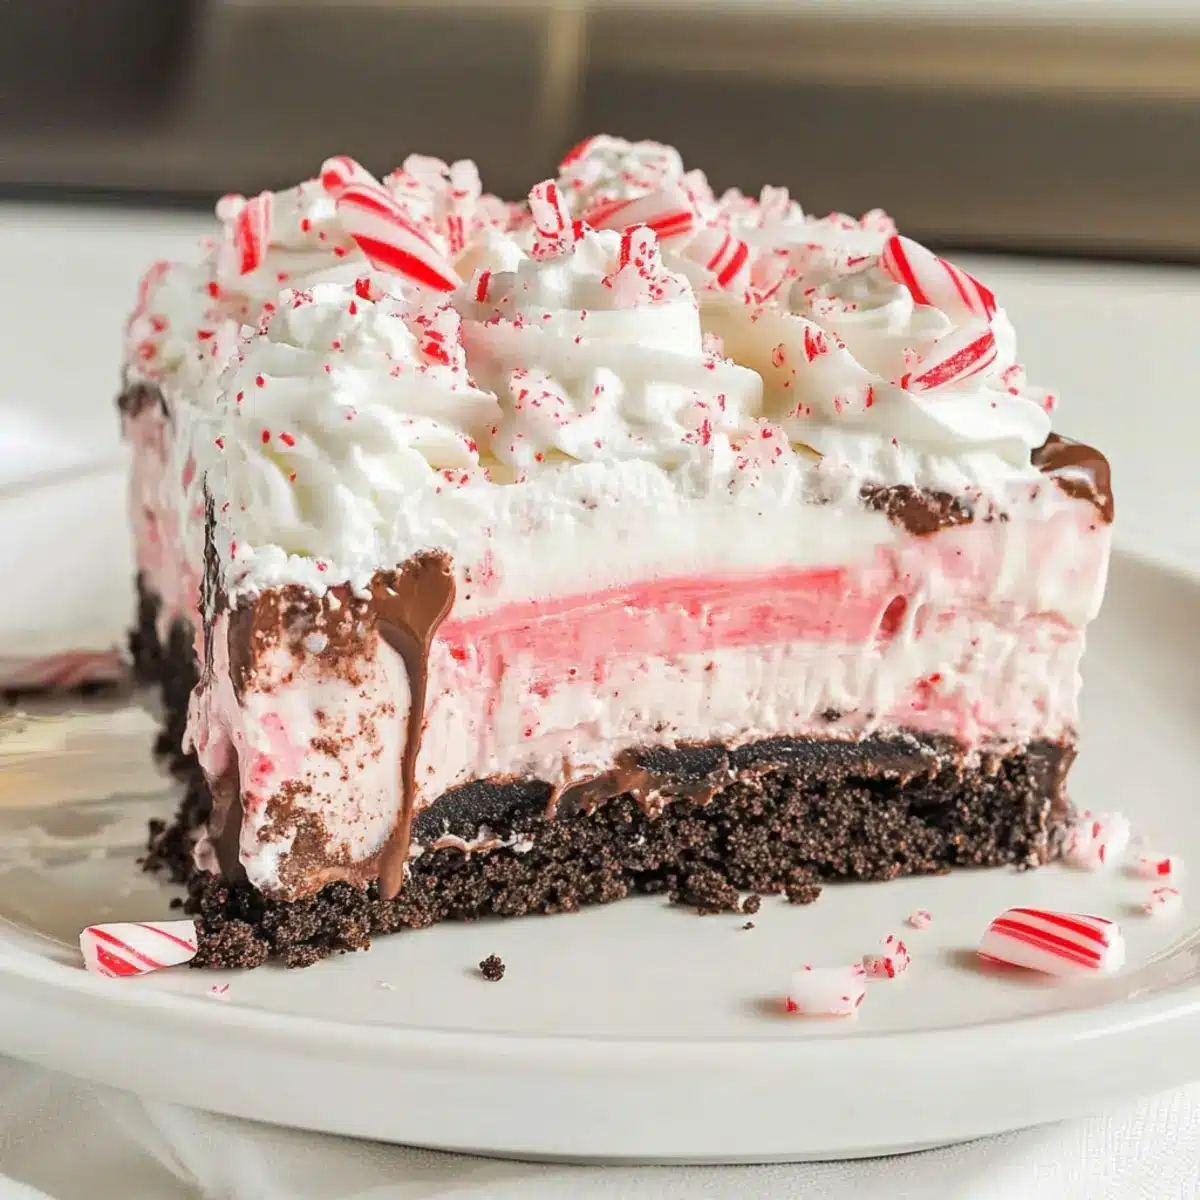
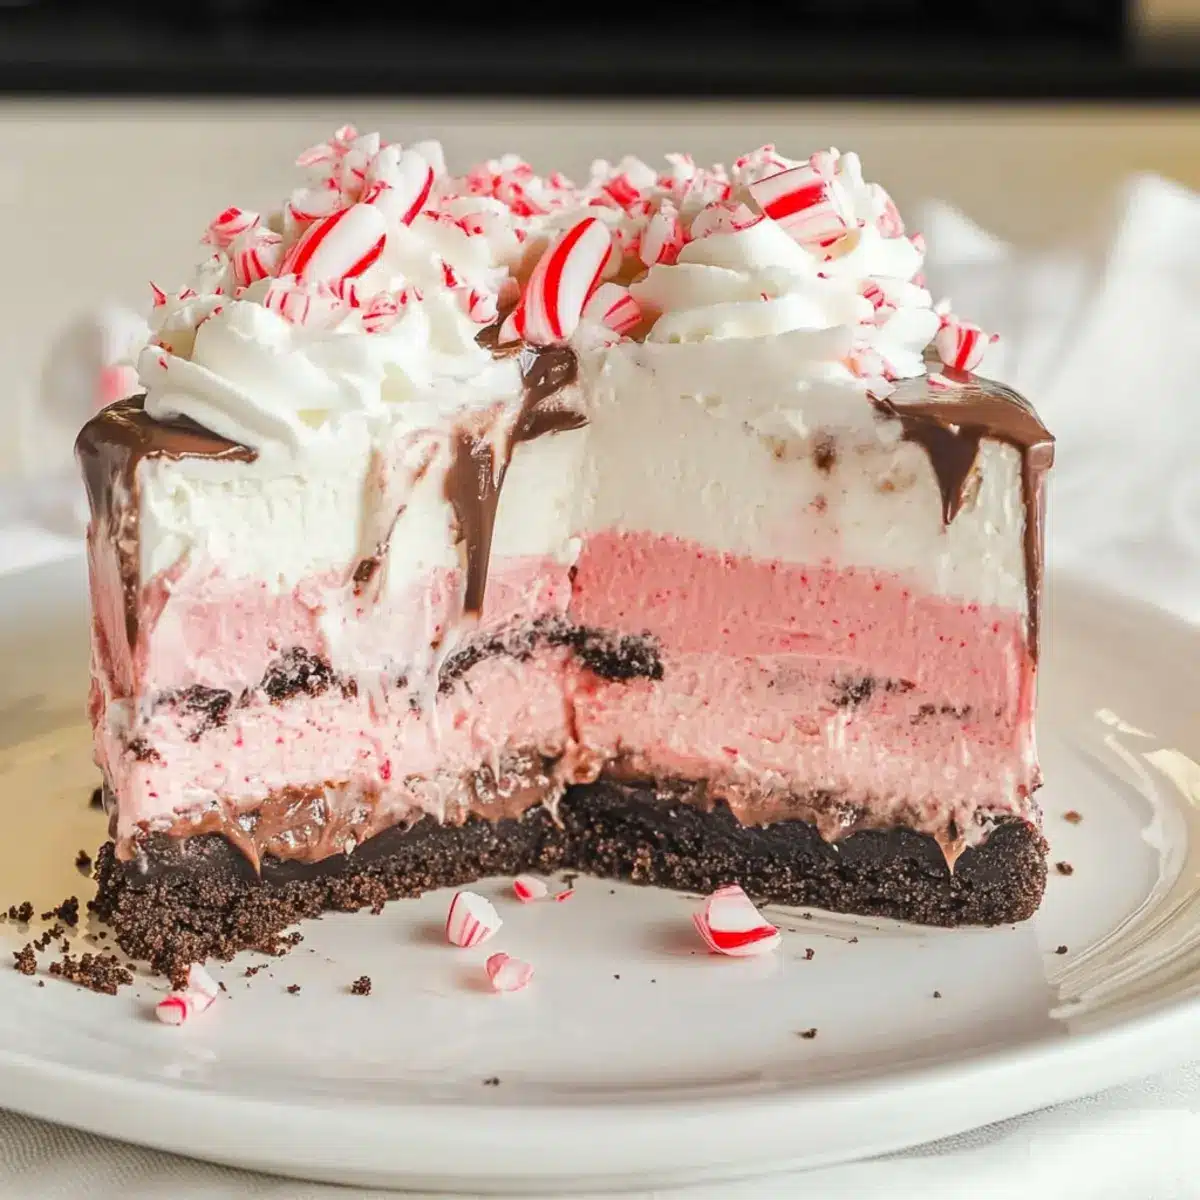
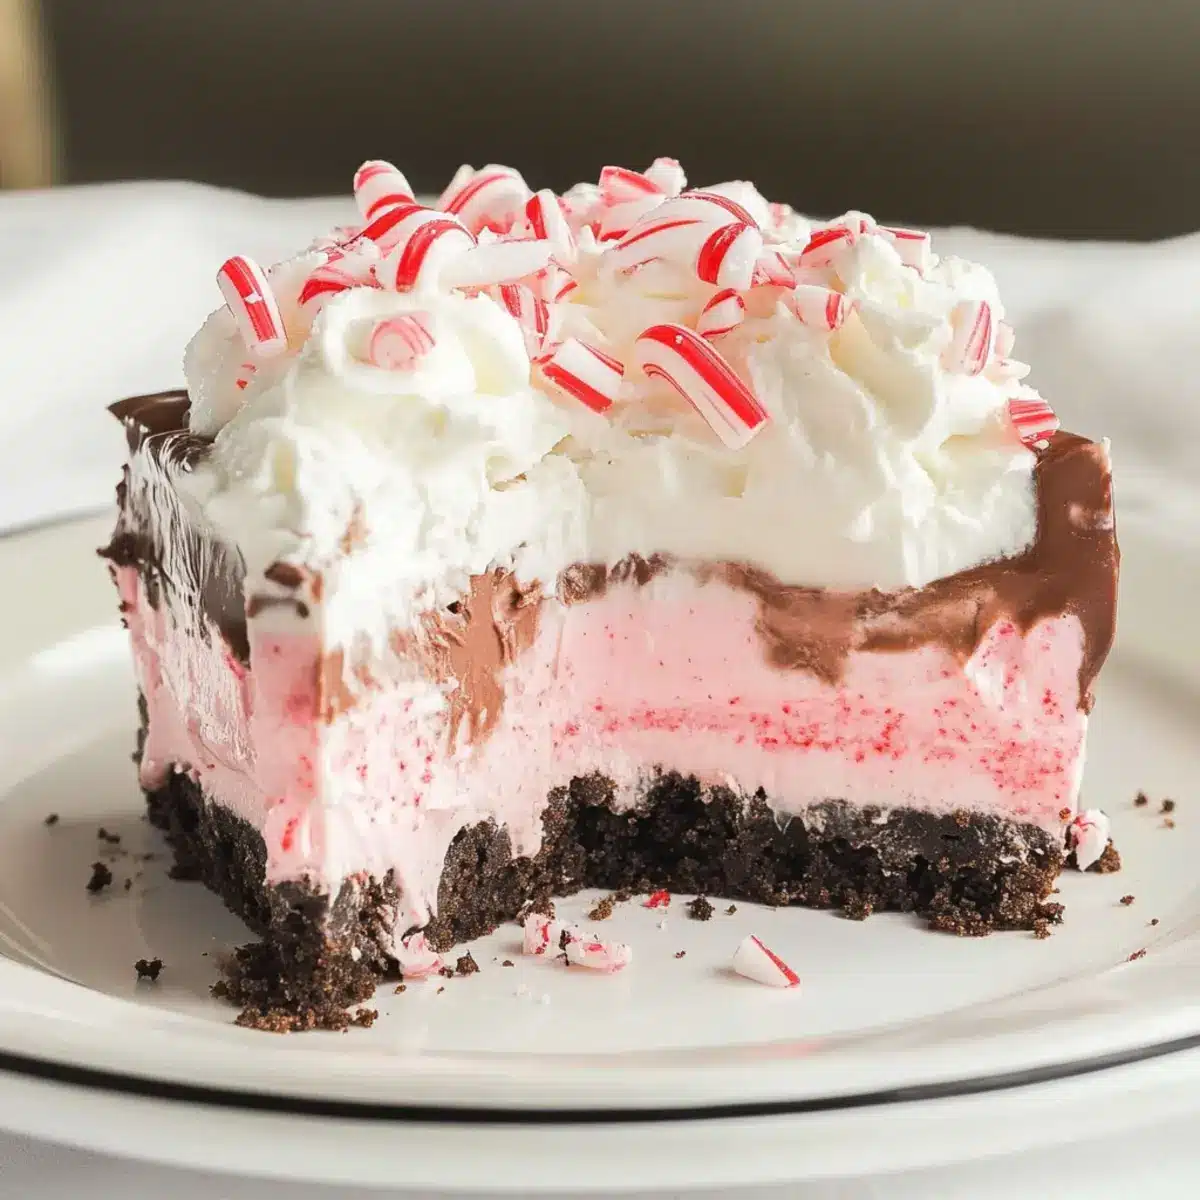
As I stood in my kitchen, the scent of chocolate and peppermint wafting through the air, I realized I had stumbled upon a holiday masterpiece: the no-bake Chocolate Peppermint Lush. This elegant dessert layers rich peppermint cheesecake and velvety chocolate pudding atop a crunchy Oreo crust, making it a showstopper for any festive gathering. One of the best perks? It can be prepared a day in advance, freeing up precious time for last-minute holiday preparations. Plus, its no-bake nature means no fussing with an oven when things get hectic. Picture your friends and family gathered around, raving about this delightful treat while you bask in the warm glow of holiday cheer. Are you ready to whip up this dream dessert that combines ease and indulgence? Let’s dive in!

Why is this Chocolate Peppermint Lush perfect?
Irresistible Layers: The delightful contrast of peppermint cheesecake and chocolate pudding creates a show-stopping dessert that your guests will adore.
Effortless Preparation: Perfect for those who love hassle-free cooking, this no-bake recipe allows you to focus on enjoying the festivities, with no oven required!
Crowd-Pleasing Dessert: It’s a festive treat that doesn’t just look impressive but tastes incredible, making it ideal for holiday gatherings or as a sweet finish to your Christmas dinner.
Make-Ahead Convenience: Prepare it a day in advance to save time—just pop it in the fridge and serve when you’re ready. For another easy festive dessert, check out my White Christmas Peppermint Meringues.
Customizable Flavor: Feel free to switch up the toppings with crushed Oreos or chocolate chips for a twist!
Indulge in this rich, creamy Chocolate Peppermint Lush and watch it disappear from the dessert table!
Chocolate Peppermint Lush Ingredients
For the Crust
• Oreo Cookies – The sturdy base of the dessert; you can use any chocolate cookie for a similar effect.
• Butter – Helps bind the crust together and adds richness; margarine works as a perfect substitute if needed.
For the Cheesecake Layer
• Cream Cheese – The creamy texture hero of the cheesecake; make sure it’s fully softened for easy blending.
• Powdered Sugar – Sweetens and stabilizes the cheesecake layer; brown sugar could be an interesting twist if you’re feeling adventurous.
• Peppermint Extract – Provides that signature peppermint flavor; adjust to your taste for the ultimate Chocolate Peppermint Lush experience.
• Cool Whip – Lightens both the cheesecake layer and the topping; you can swap it with homemade whipped cream for a richer touch.
• Red Gel Food Coloring – Adds a festive pop; feel free to omit if you prefer a more natural look.
• Crushed Candy Canes – Adds texture and festive flair; consider larger candy pieces or different toppings if desired.
For the Chocolate Layer
• Instant Chocolate Pudding – Forms the rich chocolate layer; vanilla pudding offers a lighter alternative if you fancy.
• Half and Half – Provides creaminess to the pudding layer; whole milk or heavy cream can be used for an even richer experience.
Indulge in this decadent treat and impress your guests this holiday season!
Step‑by‑Step Instructions for Chocolate Peppermint Lush
Step 1: Prepare the Crust
Begin by greasing a 9×13 baking dish to create a non-stick surface. Crush the Oreo cookies in a food processor or by placing them in a sealed bag and using a rolling pin until finely ground. Mix the crushed cookies with melted butter, ensuring everything is well combined. Press this mixture firmly into the bottom of the dish, creating an even layer, and freeze for 20 minutes to set.
Step 2: Make Peppermint Cheesecake Layer
In a mixing bowl, blend softened cream cheese, powdered sugar, and peppermint extract until the mixture is smooth and creamy, typically around 2-3 minutes of mixing. Gently fold in the Cool Whip until fully incorporated, followed by the crushed candy canes for festive flair. Once combined, spread this peppermint cheesecake mixture evenly over the chilled Oreo crust, smoothing out the top with a spatula.
Step 3: Prepare Chocolate Pudding Layer
In a separate mixing bowl, whisk together the instant chocolate pudding mix with half and half for about 2 minutes until it thickens and is free of lumps. Once the pudding is ready, layer it carefully on top of the peppermint cheesecake layer, making sure to spread it evenly to prevent mixing. Refrigerate the layered dessert for 5-10 minutes to allow the pudding to set slightly.
Step 4: Final Layer
Spread the remaining Cool Whip over the chocolate pudding layer using a spatula, smoothing it out to create an even, fluffy topping. If desired, you can add a few drops of red gel food coloring to the Cool Whip for a festive touch. Cover the entire dessert with plastic wrap and refrigerate for a minimum of 8 hours or overnight to achieve the best flavor and texture.
Step 5: Serve
Once the Chocolate Peppermint Lush has chilled and set, remove it from the refrigerator. Just before serving, sprinkle the top with additional crushed candy canes to add crunch and visual appeal. Slice into squares, and enjoy this stunning layered dessert that is sure to impress your holiday guests!
What to Serve with No-Bake Chocolate Peppermint Lush
Imagine gathering around the table, your guests eagerly anticipating a delightful spread to complement this creamy dessert.
-
Warm Spiced Cider: A cozy drink that balances the rich flavors of the Chocolate Peppermint Lush, making for a comforting festive experience. Its warm spices will set a cheerful holiday mood!
-
Classic Gingerbread Cookies: Their soft and spicy essence harmonizes beautifully with the chocolate and peppermint layers, adding a fun crunch and ginger kick. Serve them alongside for a delightful dip into holiday nostalgia.
-
Peppermint Hot Chocolate: This indulgent drink brings together chocolate and mint, creating an article of rich flavor that will leave everyone enchanted. Top it with fluffy whipped cream for a delightful presentation!
-
Vanilla Ice Cream: A scoop of creamy vanilla ice cream contrasts wonderfully with the luscious layers of the dessert, bringing a cool freshness to the plate. Drizzling it with chocolate sauce wouldn’t hurt either!
-
Homemade Chewy Fudge Brownies: These decadent brownies are a wonderfully rich pairing. Their fudgy texture adds contrast and satisfies the chocolate lover in all of us, making your dessert table irresistible.
-
Chocolate Dipped Fruit: Lightening up the dessert table, fresh fruits dipped in chocolate provide a refreshing twist. Think strawberries and bananas; their sweetness pairs harmoniously with the Chocolate Peppermint Lush.
-
Holiday Fruit Salad: A colorful mix of seasonal fruits adds a refreshing contrast to the rich lush. The zest from the citrus will leave a bright note on your palate, rounding off the meal perfectly!
-
Sparkling Cranberry Lemonade: This tangy and fizzy drink will invigorate your guests, offering a refreshing balance to the dessert’s richness while still capturing a holiday essence.
Serve any of these delicious pairings alongside your Chocolate Peppermint Lush, and watch as they bring your holiday gathering to life!
Expert Tips for Chocolate Peppermint Lush
-
Softened Cream Cheese: Ensure your cream cheese is fully softened to prevent lumps in the cheesecake layer; this creates a silkier texture.
-
Chill Time Matters: Refrigerating the dessert overnight allows the flavors to meld beautifully, enhancing the overall taste of your Chocolate Peppermint Lush.
-
Layer Careful: When adding the chocolate pudding layer, spread it evenly to avoid mixing with the cheesecake layer beneath; this maintains the stunning layers you want to showcase.
-
Candy Cane Crunch: Add crushed candy canes just before serving to keep them crispy; otherwise, they can become soggy and lose their festive crunch.
-
Use Quality Ingredients: For the richest flavor, choose high-quality cocoa powder and real peppermint extract; this elevates your dessert’s overall taste and festive appeal.
Make Ahead Options
Preparing your Chocolate Peppermint Lush ahead of time is a dream come true for busy holiday cooks! You can make the crust and cheesecake layer up to 24 hours in advance; simply press the crust into the dish and refrigerate until ready to add the layers. The chocolate pudding and whipped cream can also be prepared in advance, ideally within 3 days of serving. Just make sure to layer and cover tightly with plastic wrap to maintain freshness and prevent any drying. When you’re ready to enjoy, simply layer the chilled pudding and remaining Cool Whip, then sprinkle with crushed candy canes just before serving for that delightful crunch. This way, you’ll have a show-stopping dessert that’s just as delicious, with minimal effort on the day of your celebration!
Storage Tips for Chocolate Peppermint Lush
Fridge: Store any leftovers covered in the refrigerator for up to 3 days to keep them fresh and maintain texture.
Freezer: For longer storage, you can freeze slices of the Chocolate Peppermint Lush in an airtight container for up to 1 month. Thaw in the fridge overnight before serving.
Reheating: This dessert is best served cold, so there’s no need to reheat. Simply slice and enjoy straight from the fridge!
Serving Freshness: If you’ve made this dessert in advance, sprinkle crushed candy canes right before serving to keep them crunchy and visually appealing.
Chocolate Peppermint Lush Variations
Feel free to personalize this delightful dessert with these tempting twists and substitutions!
-
Dairy-Free: Use coconut cream instead of cream cheese and find a dairy-free whipped topping for a deliciously creamy vegan option.
Switching to plant-based products opens up a world of possibilities without sacrificing flavor. -
Gluten-Free: Substitute gluten-free chocolate cookies for the crust and make sure your pudding mix is certified gluten-free.
It’s a wonderful way to accommodate dietary needs while still enjoying a fabulous dessert! -
Extra Festive Flavor: Add a pinch of espresso powder to the chocolate pudding layer for a delightful mocha twist.
This small addition elevates the overall richness and complexity of the dessert. -
Nutty Crunch: Stir finely chopped walnuts or pecans into the cheesecake layer for added crunch and flavor.
The nutty texture pairs beautifully with the smooth layers and adds a satisfying element. -
Fruit Infusion: Replace crushed candy canes with chopped raspberries, strawberries, or other berries for a fruity flair.
The berries will introduce a bright note that complements the chocolate perfectly. -
Heavenly Mint Swirl: Fold some mint chocolate chip ice cream into the Cool Whip before spreading it on the top for an extra minty kick.
This twist not only enhances the mint flavor but also creates a visually appealing dessert. -
White Chocolate Delight: Swap regular chocolate pudding for white chocolate pudding for a decadent take on the classic dessert.
This variation takes it to a whole new level, perfect for white chocolate lovers! -
Chocolate Layer Upgrade: Drizzle melted chocolate or caramel over the top layer for an eye-catching finish.
A little drizzle goes a long way, enhancing aesthetics and adding rich flavor!
Who can resist these variations? If you’re in the mood for something equally delightful, check out my Disneyland’s Hot Chocolate Recipe for a cozy drink to complement your dessert!
Chocolate Peppermint Lush Recipe FAQs
How do I select the best ingredients for my Chocolate Peppermint Lush?
For the best flavor, ensure your cream cheese is completely softened at room temperature for easier blending. When selecting peppermint extract, look for high-quality pure extract to achieve an authentic taste. Use fresh, unbroken candy canes for your garnish, as they add a delightful crunch and visual appeal to your dessert.
What is the best way to store leftover Chocolate Peppermint Lush?
Store any leftovers covered in the refrigerator for up to 3 days. Make sure it’s in an airtight container to prevent it from absorbing other odors in the fridge. For optimal freshness, I recommend enjoying it within the first couple of days.
Can I freeze Chocolate Peppermint Lush?
Absolutely! You can freeze slices of the Chocolate Peppermint Lush in an airtight container for up to 1 month. When you’re ready to enjoy it, simply thaw it in the refrigerator overnight. It’s best served cold, so there’s no need to reheat!
What if my cheesecake layer has lumps?
If your cheesecake layer has lumps, the most likely cause is that the cream cheese wasn’t softened enough. Always ensure your cream cheese is at room temperature before mixing. If lumps occur, use an electric mixer for a bit longer, or try pushing the mixture through a fine mesh sieve to achieve a smooth, creamy texture.
Is the Chocolate Peppermint Lush suitable for people with allergies?
This dessert contains common allergens such as dairy and gluten from the cookies. If you’re making it for someone with dietary restrictions, consider using gluten-free chocolate cookies and dairy-free cream cheese alternatives. Always check the labels for any unexpected allergens when selecting ingredients.
When should I add the crushed candy canes?
To maintain their crunch, add the crushed candy canes just before serving. If added too early, they can become soggy and lose their delightful texture. Sprinkling them on top right before serving gives your Chocolate Peppermint Lush that festive touch and crunch.
Decadent Chocolate Peppermint Lush That'll Wow Your Guests
Ingredients
Equipment
Method
- Grease a 9x13 baking dish. Crush Oreo cookies and mix with melted butter. Press into the dish and freeze for 20 minutes.
- Blend cream cheese, powdered sugar, and peppermint extract until smooth. Fold in Cool Whip and crushed candy canes. Spread onto crust.
- Whisk chocolate pudding mix with half and half until thick. Layer on top of the cheesecake layer and refrigerate for 5-10 minutes.
- Spread remaining Cool Whip on top. Optionally, add red gel food coloring. Cover and refrigerate for 8 hours or overnight.
- Before serving, sprinkle with additional crushed candy canes. Slice and enjoy!
Leave a Reply