
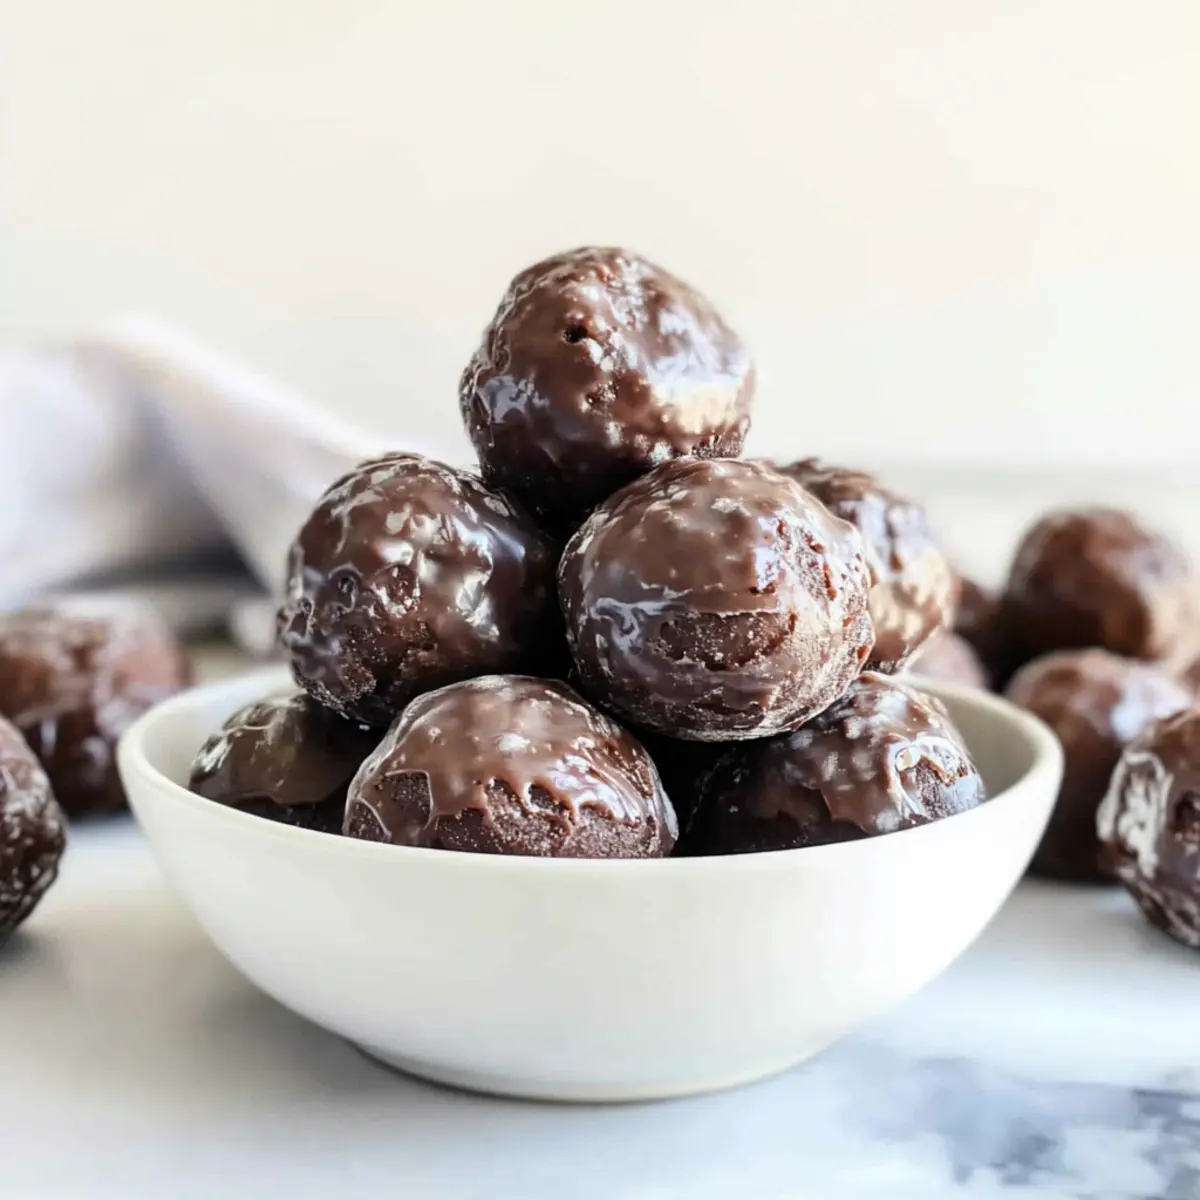
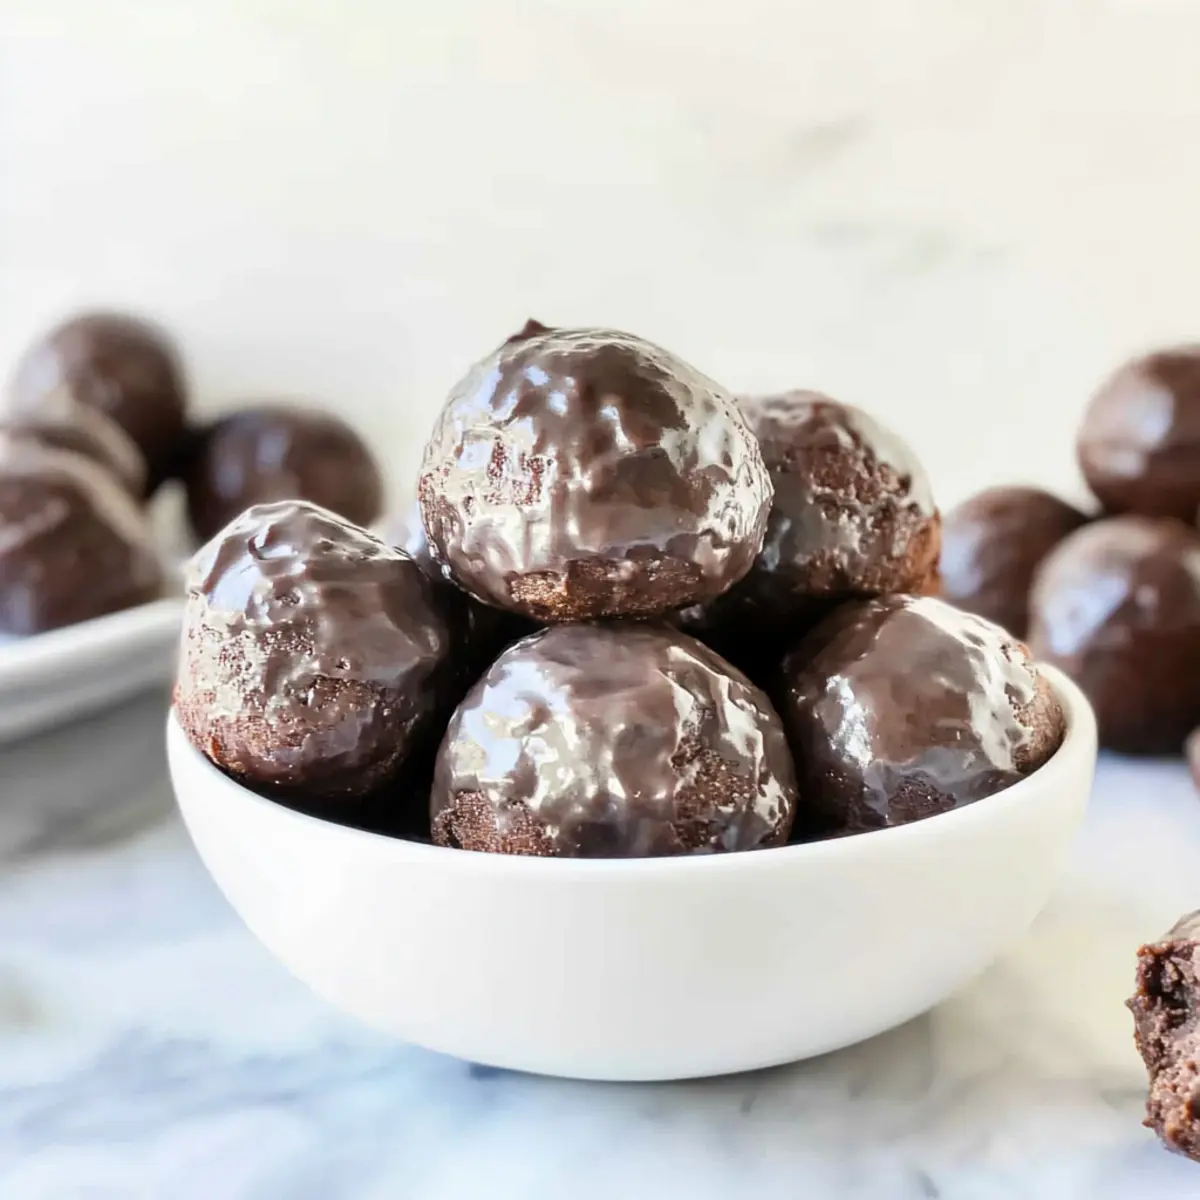
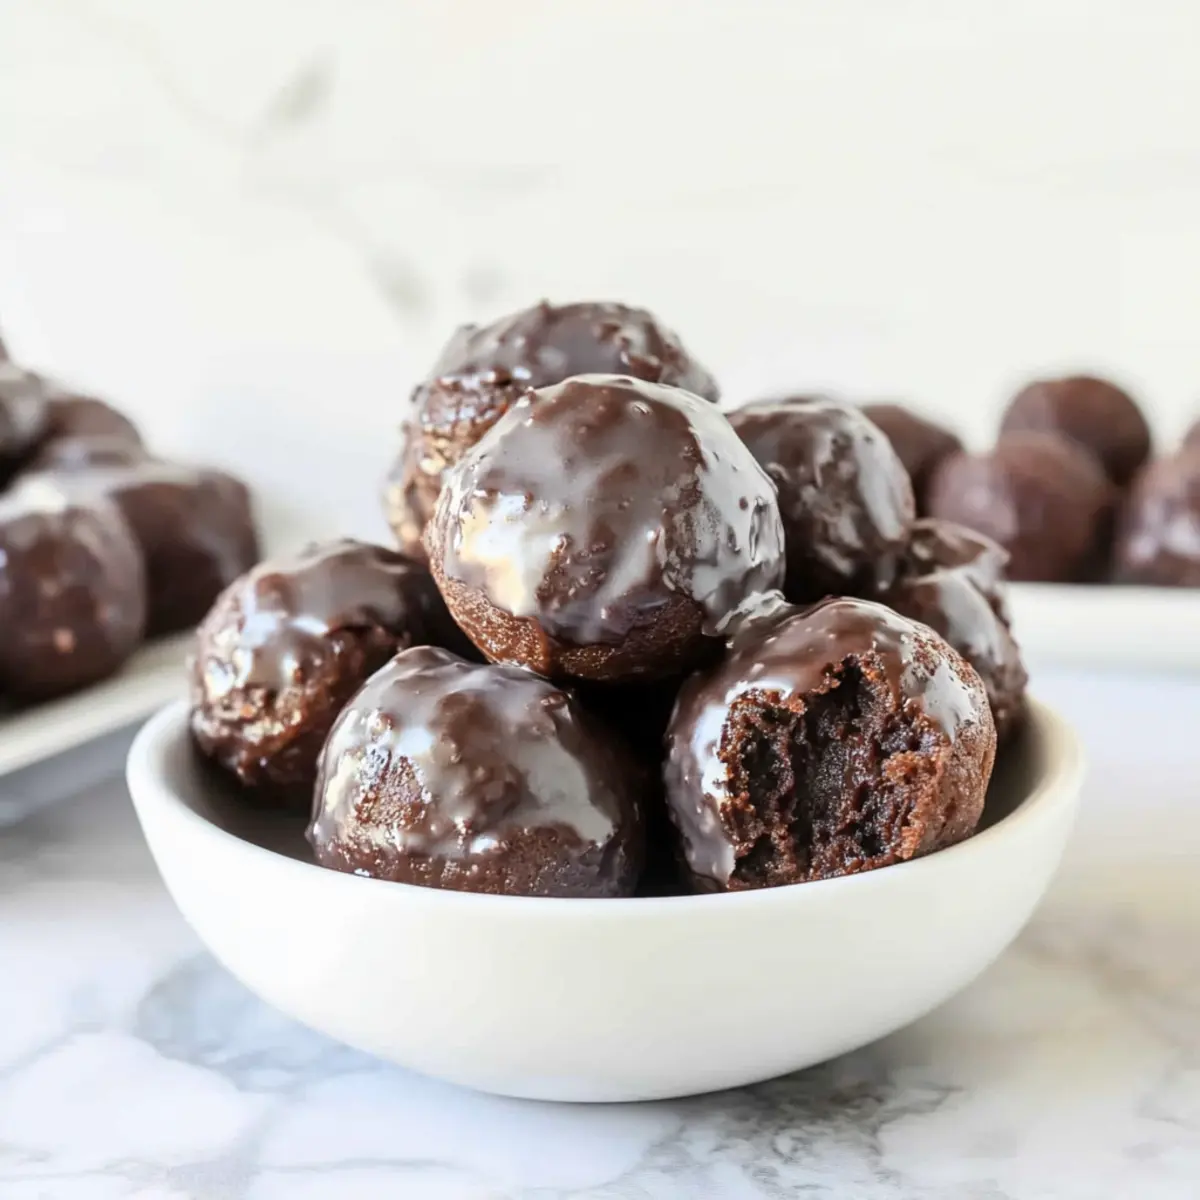
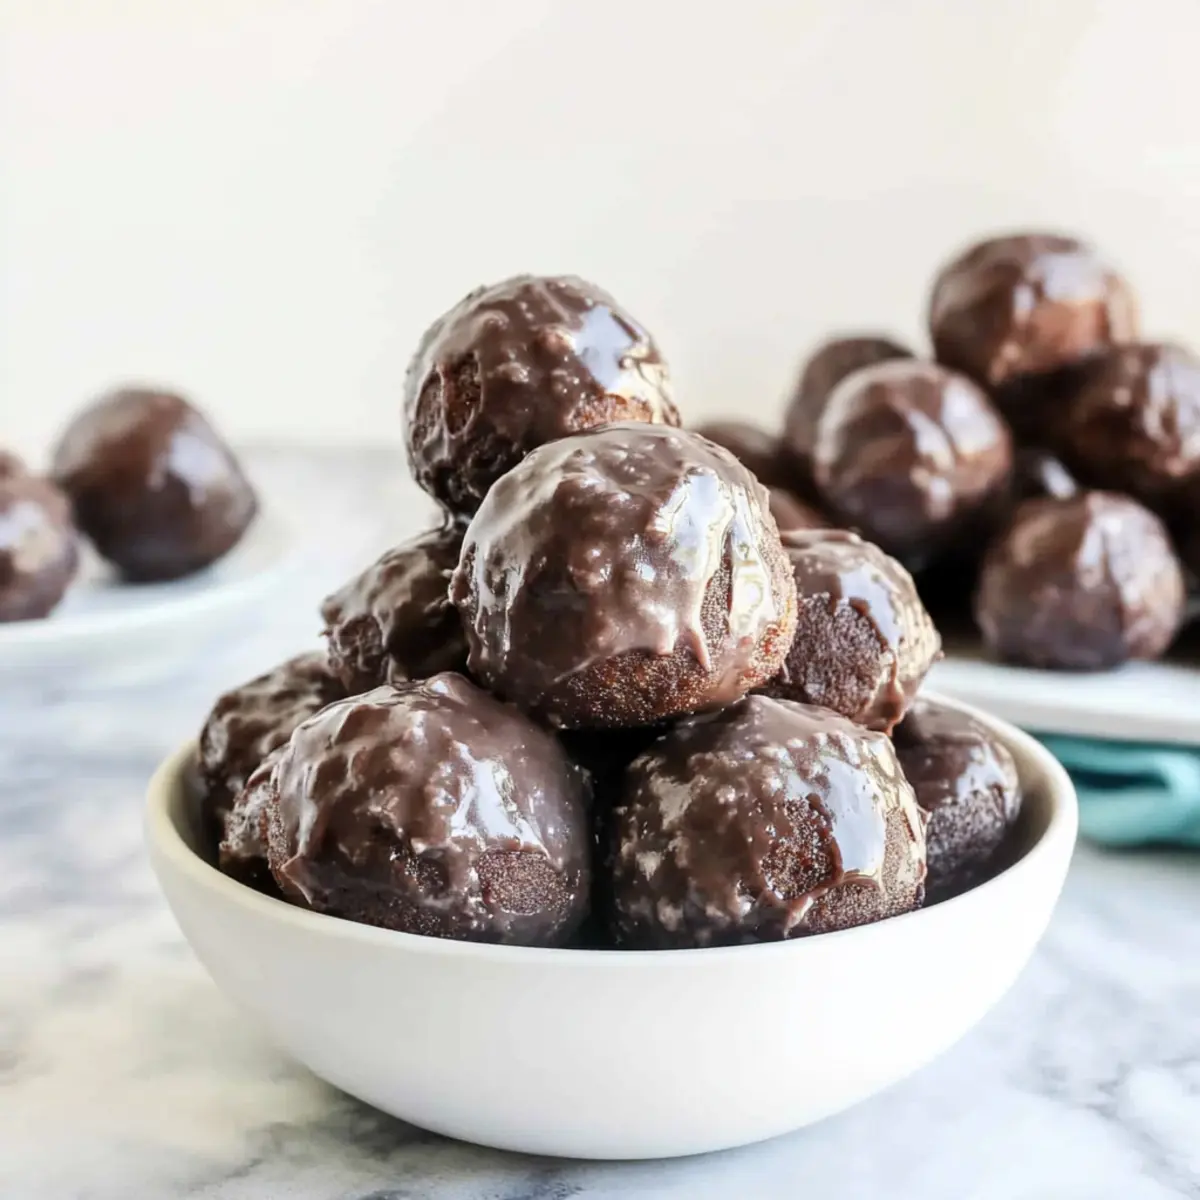
As the smell of warm chocolate gradually fills your kitchen, you might find it hard to resist sneaking a bite! This is the irresistible allure of my Gluten-Free Baked Chocolate Donut Holes. With just a mini muffin pan and a handful of pantry staples, you can whip up these light, fluffy delights in no time. They’re perfect as a sweet treat for the kids, brunch additions that impress, or a fun dessert at any gathering. Plus, these baked donut holes are not only gluten-free but also a breeze to make—no frying necessary! As you embark on this easy recipe adventure, who do you think will love them more: your kids or your inner chocolate lover?
Why are these donut holes so irresistible?
Ease of Preparation: With just a few basic ingredients and a mini muffin pan, you can create these fluffy treats without the hassle of frying.
Kid-Friendly Fun: Not only are they gluten-free, but these baked chocolate donut holes are a delightful way to involve your little chefs in the kitchen.
Versatile Delight: Perfect for breakfast, snacks, or dessert, you can enjoy them with a glaze or plain. Pair them with coffee or milk for an extra treat!
Flavor Explosion: Each bite delivers rich chocolatey goodness, thanks to cocoa powder and fluffy texture that’ll leave everyone reaching for more.
Storage Win: Easily store your creations in an airtight container for up to 3 days, or freeze them for a future indulgence. These donut holes are destined to become a family favorite, just like the Savory Baked French Toast for breakfast!
Baked Chocolate Donut Holes Ingredients
• Gather your ingredients and let’s start creating those fluffy delights!
For the Donut Holes
- Butter – Adds richness and moisture; use unsalted for better flavor control.
- Maple Syrup – Provides natural sweetness and moisture; substitute with honey or granulated sugar if preferred.
- Plain Greek Yogurt – Contributes to fluffiness; replace with sour cream, mashed banana, or pumpkin puree for variety.
- Milk – Aids in achieving the ideal batter consistency; any milk type—dairy or non-dairy—works well.
- Vanilla Extract – Enhances flavor complexity; opt for clear vanilla if a light glaze is desired.
- Eggs – Binds the mixture and helps with leavening; use a flax egg for an egg-free alternative.
- Gluten-Free All Purpose Flour – Offers structure without gluten; brands like Bob’s Red Mill 1:1 are great options.
- Baking Soda – Essential for rising; be sure it’s fresh for optimal results.
- Salt – Balances sweetness and heightens flavors in the donut holes.
- Cocoa Powder – Delivers a rich chocolate flavor; sift before adding to eliminate clumps.
For the Glaze
- Powdered Sugar – Provides sweetness for the glaze; mix with vanilla extract for an extra flavor boost.
- Milk for Glaze – Adjusts the consistency, ensuring it’s perfect for dipping; modify the amount based on your preferred thickness.
With these ingredients at hand, your journey to delicious baked chocolate donut holes is just beginning!
Step‑by‑Step Instructions for Gluten-Free Baked Chocolate Donut Holes
Step 1: Preheat the Oven
Begin your delightful journey by preheating your oven to 350°F (175°C). While the oven warms, grab a mini muffin pan and generously grease each cavity with non-stick spray to ensure easy release of your baked chocolate donut holes later. The aroma of melting chocolate awaits!
Step 2: Mix the Wet Ingredients
In a large mixing bowl, whisk together the melted unsalted butter and maple syrup until well combined. Add the plain Greek yogurt, milk, and vanilla extract, and mix until smooth. Finally, crack in the eggs, whisking until you achieve a creamy, cohesive mixture that brings all the flavors together.
Step 3: Combine Dry Ingredients
Now, in the same bowl, add the gluten-free all-purpose flour, baking soda, and salt directly into the wet mixture. Be sure to sift the cocoa powder using a fine mesh strainer to remove any lumps before folding it in. Gently mix until you have a smooth, thick batter that showcases the rich chocolatey goodness.
Step 4: Fill the Muffin Pan
Using a small cookie scoop or a spoon, fill each muffin cavity with the glorious batter, being careful not to overfill—aim for about three-quarters full. As you work, you’ll see the chocolatey batter transform each empty space into a little haven of sweetness, ready to bake.
Step 5: Bake and Test for Doneness
Place the filled muffin pan in the preheated oven and bake for 9-11 minutes. Keep an eye on them! When they’re done, the tops will feel spongy to the touch, and a toothpick inserted into the center will come out clean. Your gluten-free baked chocolate donut holes are almost ready!
Step 6: Cool on a Rack
Once baked, carefully remove the pan from the oven and let your donut holes cool in the pan for about 5 minutes. Then, gently coax each one out onto a wire rack to cool completely. This step helps achieve the perfect texture—fluffy and light—awaiting a delicious glaze.
Step 7: Prepare the Glaze
While the donut holes cool, whisk together powdered sugar with 8 teaspoons of milk in a medium bowl until the mixture is smooth and glossy. If desired, add a splash of vanilla extract for an extra flavor twist. Adjust the milk content for your preferred thickness—thicker for dipping or thinner for drizzling.
Step 8: Glaze the Donut Holes
Once the donut holes have cooled completely, dip each one into the prepared glaze, allowing the excess to drip off back into the bowl. Return them to the wire rack, ensuring each piece gets a delightful coating that adds the perfect touch of sweetness to your gluten-free baked chocolate donut holes.
What to Serve with Gluten-Free Baked Chocolate Donut Holes
Indulge in a delightful experience by complementing your sweet treats with options that enhance flavors and textures.
-
Fresh Fruit Salad: A vibrant medley of berries and melons brings a refreshing balance to the rich chocolate flavor.
-
Whipped Cream: Light and airy, a dollop of whipped cream adds a creamy element that beautifully contrasts the soft, fluffy donut holes.
-
Coffee or Espresso: The deep, roasted notes of coffee pair wonderfully, balancing the sweetness while offering a warm beverage option.
-
Milk: A classic companion that enhances your chocolate experience, making each bite feel even richer and more indulgent.
-
Chocolate Drizzle: For chocolate enthusiasts, a drizzle over the donut holes intensifies their flavor, taking your treat to the next level.
-
Peanut Butter Dip: A creamy, nutty dip not only adds protein but also a delicious contrast to the sweetness of the donut holes.
Treat your family and friends to a memorable dessert experience by thoughtfully pairing these options with your gluten-free baked chocolate donut holes!
Make Ahead Options
These Gluten-Free Baked Chocolate Donut Holes are perfect for meal prep enthusiasts! You can prepare the batter and store it in the fridge for up to 24 hours before baking; this allows the flavors to meld beautifully. Alternatively, bake the donut holes in advance, and they will stay fresh in an airtight container at room temperature for up to 3 days. To ensure optimal texture, let them cool completely before storing. When you’re ready to serve, simply glaze them as instructed, and enjoy these delightful treats just as delicious as when they were fresh out of the oven. With these make-ahead options, you can effortlessly enjoy your chocolatey indulgence on busy mornings!
How to Store and Freeze Baked Chocolate Donut Holes
Room Temperature: Store your baked chocolate donut holes in an airtight container at room temperature for up to 3 days to maintain their fluffy texture and delicious flavor.
Fridge: If you prefer a longer shelf life, refrigerate the donut holes in an airtight container for up to a week. Just remember they’ll taste freshest when enjoyed at room temperature!
Freezer: Freeze donut holes individually on a baking sheet for 1-2 hours, then transfer to a freezer bag for up to 2 months. Thaw overnight in the fridge before enjoying.
Reheating: For a warm treat, reheat in the microwave for 10-15 seconds or in an oven at 350°F (175°C) for a few minutes until warmed through.
Expert Tips for Baked Chocolate Donut Holes
-
Sift Cocoa Powder: Ensure your cocoa is sifted to avoid clumps, resulting in a smooth and rich chocolate flavor in your baked donut holes.
-
Cool Before Glazing: Allow the donut holes to cool completely before glazing. This prevents the glaze from becoming a runny mess and ensures a beautiful finish.
-
Storage Solutions: Keep your donut holes fresh by storing them in an airtight container, where they will last for up to 3 days, or freeze for longer storage.
-
Use Mini Spatulas: If batter gets stuck in your scoops, mini spatulas make handling easier and ensure every last bit of your delicious batter gets baked into donut holes!
-
Experiment with Glazes: Don’t hesitate to try different flavorings in the glaze. A hint of almond extract or citrus zest can elevate your baked donut holes to new heights!
Baked Chocolate Donut Holes Variations
Feel free to get creative with these baked chocolate donut holes and tailor them to your taste buds!
-
Dairy-Free: Substitute Greek yogurt with coconut yogurt and use almond milk for a delightful dairy-free treat. These alternatives don’t skimp on flavor while ensuring everyone can enjoy them.
-
Nut-Free: Swap almond milk for oat milk, and ensure your gluten-free flour blend is nut-free. Everyone can savor these sweet delights, making them suitable for school lunches or gatherings.
-
Sugar-Free: Utilize a sugar substitute like erythritol or stevia in place of maple syrup to create a treat lower in sugar. You’ll not only satisfy your sweet tooth but also watch your sugar intake!
-
Chocolate Lovers’ Twist: Add mini chocolate chips or cacao nibs to the batter before baking for an extra gooey chocolate experience in every bite. Imagine that rich, melty chocolate filling inside your fluffy donut holes!
-
Citrus Zest Glaze: Infuse your glaze with lemon or orange zest for a refreshing twist that pairs beautifully with chocolate. The bright citrus notes will contrast deliciously with the chocolate, making each bite burst with flavor!
-
Spiced Delight: Incorporate a dash of cinnamon or espresso powder into the batter for an exciting flavor boost. These spices will add warmth, making your gluten-free baked chocolate donut holes even more irresistible.
-
Fruity Add-Ins: Toss in some finely chopped strawberries or raspberries for a fruity surprise, creating a delightful contrast to the rich chocolate flavor. Each bite will be a surprise explosion of tangy berries!
To accompany those delectable donut holes, why not pair them with a rich White Hot Chocolate or a comforting cup of Disneyland’s Hot Chocolate?
Gluten-Free Baked Chocolate Donut Holes Recipe FAQs
What’s the best way to choose ripe ingredients for this recipe?
When selecting ingredients, always go for fresh, high-quality items. For butter, unsalted is best for flavor control. Check your maple syrup for a pure, robust flavor, while for Greek yogurt, look for creamy textures with no added ingredients. Always ensure your eggs are fresh—look for a consistent color and smooth shell!
How long can I store these donut holes and what’s the best method?
You can store your gluten-free baked chocolate donut holes in an airtight container at room temperature for up to 3 days—perfect for keeping them fluffy and tasty! Alternatively, if you wish to keep them longer, you can refrigerate them for up to a week, but they tend to taste best at room temperature.
Can I freeze gluten-free baked chocolate donut holes?
Absolutely! To freeze your donut holes, first lay them out in a single layer on a baking sheet and freeze for 1-2 hours. Once solid, transfer them to a freezer bag, making sure to remove as much air as possible. They can be stored for up to 2 months. To enjoy, simply thaw them overnight in the fridge before serving.
What should I do if my donut holes come out dense or gummy?
If your donut holes turn out dense, there may be a few reasons. Ensure that you measure your gluten-free flour correctly—using a kitchen scale can help! Additionally, make sure your baking soda is fresh, as older baking soda may not provide the rise you need. If you’ve overmixed your batter, it can also lead to density, so mix just until combined for the fluffiest donut holes!
Are these donut holes pet-friendly or suitable for those with allergies?
While these gluten-free baked chocolate donut holes are safe for most humans, they contain ingredients like dairy and eggs, which are not suitable for pets. If you have any allergies, be cautious with the Greek yogurt and potential nut milk alternatives. Always check labels for possible allergens, and feel free to modify the ingredients to meet your dietary needs!
Delicious Baked Chocolate Donut Holes Everyone Will Love
Ingredients
Equipment
Method
- Preheat the oven to 350°F (175°C) and grease the mini muffin pan.
- In a large mixing bowl, whisk together melted butter and maple syrup until combined. Add yogurt, milk, and vanilla, then mix until smooth. Lastly, add eggs and whisk until creamy.
- Add gluten-free flour, baking soda, salt, and sifted cocoa powder to the wet ingredients. Mix gently until you have a smooth batter.
- Fill each muffin cavity with batter about three-quarters full.
- Bake for 9-11 minutes until tops are spongy, and a toothpick comes out clean.
- Cool in the pan for 5 minutes then transfer to a wire rack to cool completely.
- In a medium bowl, whisk powdered sugar and milk until smooth. Add vanilla if desired. Adjust milk for thickness.
- Dip each cooled donut hole into the glaze and allow excess to drip off before placing back on the rack.
Leave a Reply